コマンドを作成する
現時点で、SPREADには「Code」と「Name」のデータだけが表示されていますので、選択された製品の「Price」を取得するというコマンドを作成しましょう。ビュー側でコマンドをバインディングできるのは、基本的にMenuItemやButtonといったICommandインタフェースを実装したコントロールです。SPREADでは、ボタン型セルにコマンド機能を設定することができます。ただし、ボタン型セルのCommandプロパティは、依存関係プロパティではないため、ビューモデルのプロパティとして公開されたコマンドに直接バインドすることはできません。そこで、ボタン型セルに設定するカスタムコマンドのパラメータに、ビューで作成したビューモデルのインスタンスを渡す方法を紹介します。
ビューモデルにプロパティを追加
ProductViewModelクラスにビューとバインディングするデータをプロパティとして追加します。ここでは、選択された製品「SelectedProduct」と、製品名「ProductName」、価格「ProductPrice」の3つのプロパティを追加し、それぞれビューに変更が通知されるよう、OnPropertyChangedメソッドを実装します。
Private Property _productName
Public Property ProductName As String
    Get
        Return _productName
    End Get
    Set(value As String)
        _productName = value
        OnPropertyChanged("ProductName")
    End Set
End Property

Private Property _productPrice
Public Property ProductPrice As Integer
    Get
        Return _productPrice
    End Get
    Set(value As Integer)
        _productPrice = value
        OnPropertyChanged("ProductPrice")
    End Set
End Property

Private Property _selectedProduct
Public Property SelectedProduct As Product
    Get
        Return _selectedProduct
    End Get
    Set(value As Product)
        _selectedProduct = value
        OnPropertyChanged("SelectedProduct")
    End Set
End Property
private string _ProductName;
public string ProductName
{
    get { return _ProductName; }
    set
    {
        _ProductName = value;
        OnPropertyChanged("ProductName");
    }
}

private int _ProductPrice;
public int ProductPrice
{
    get { return _ProductPrice; }
    set
    {
        _ProductPrice = value;
        OnPropertyChanged("ProductPrice");
    }
}

private Product _SelectedProduct;
public Product SelectedProduct
{
    get { return _SelectedProduct; }
    set
    {
        _SelectedProduct = value;
        OnPropertyChanged("SelectedProduct");
    }
}
コマンドを実装
次に、選択された製品から、製品名と価格を取得するコマンドを実装します。コマンドはICommandインタフェースを実装します。ボタン型セルにコマンドを設定すると、Executeメソッドのパラメータからは、セルの情報を保存したCellCommandParameterオブジェクトを取得できます。CellCommandParameterクラスのCustomCommandParameterプロパティには、任意の情報を保存できます。ここでは、ProductViewModelオブジェクトを保存し、ビューモデルクラスのメンバにアクセスできるようにします。
‘ 次の名前空間宣言を追加しています。
‘ Imports GrapeCity.Windows.SpreadGrid

Public Class GetPriceCommand
    Implements ICommand

    Public Event CanExecuteChanged As EventHandler Implements ICommand.CanExecuteChanged

    Public Function CanExecute(parameter As Object) As Boolean Implements ICommand.CanExecute
        Return True
    End Function

    Public Sub Execute(parameter As Object) Implements ICommand.Execute
        ' CustomCommandParameterに指定したProductViewModelオブジェクトを取得します。
        Dim cp As CellCommandParameter = parameter
        Dim viewModel As ProductViewModel = cp.CustomCommandParameter
        ' ビューモデルのプロパティを更新します。
        viewModel.ProductName = viewModel.SelectedProduct.Name
        viewModel.ProductPrice = viewModel.SelectedProduct.Price
    End Sub
End Class
// 次の名前空間宣言を追加しています。
// using GrapeCity.Windows.SpreadGrid;

public class GetPriceCommand : ICommand
{
    public event EventHandler CanExecuteChanged;

    public bool CanExecute(object parameter)
    {
        return true;
    }

    public void Execute(object parameter)
    {
        // CustomCommandParameterに指定したProductViewModelオブジェクトを取得します。
CellCommandParameter cp = parameter as CellCommandParameter;
        ProductViewModel viewModel = cp.CustomCommandParameter as ProductViewModel;
        // ビューモデルのプロパティを更新します。
        viewModel.ProductName = viewModel.SelectedProduct.Name;
        viewModel.ProductPrice = viewModel.SelectedProduct.Price;
    }
}
ビューのコントロールにバインディング
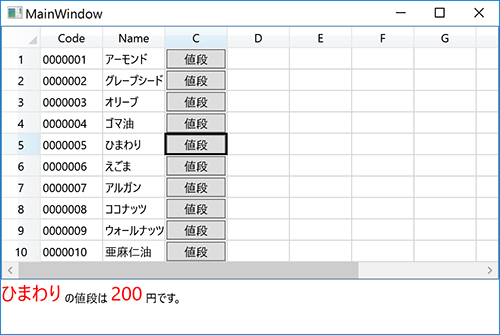
最後に、ビューモデルで定義したプロパティや、コマンドをビューのコントロールにバインディングします。まずは、選択された製品の製品名と値段を表示する、TextBlockコントロールを次のように定義します。TextプロパティにProductViewModelクラスのProductNameとProductPriceプロパティをバインディングしています。
<StackPanel Orientation="Horizontal">
    <TextBlock Text="{Binding ProductName}" FontSize="20" Foreground="Red" VerticalAlignment="Bottom"/>
    <TextBlock Text=" の値段は " VerticalAlignment="Bottom"/>
    <TextBlock Text="{Binding ProductPrice}" FontSize="20" Foreground="Red" VerticalAlignment="Bottom"/
    <TextBlock Text=" 円です。" VerticalAlignment="Bottom"/>
</StackPanel>
次に、SPREADで選択された項目とProductViewModelクラスのSelectedProductプロパティをバインドします。SPREAD側での値選択がトリガーとなる双方向バインディングであるため、ModeプロパティはTwoWayにします。
<sg:GcSpreadGrid x:Name="gcSpreadGrid1" ItemsSource="{Binding Products}" SelectedItem="{Binding SelectedProduct, Mode=TwoWay}" AutoGenerateColumns="False">
    <sg:GcSpreadGrid.Columns>
        <sg:Column>
            <sg:Column.DataField>
                <sg:PropertyDataField Property="Code" />
            </sg:Column.DataField>
        </sg:Column>
        <sg:Column>
            <sg:Column.DataField>
                <sg:PropertyDataField Property="Name" />
            </sg:Column.DataField>
        </sg:Column>
    </sg:GcSpreadGrid.Columns>
</sg:GcSpreadGrid>
コードビハインドでの同じ設定は、以下のようなコードで可能です。
' 選択行にViewModelのSelectedProductプロパティをバインドします。
Dim selectedBinding = New Binding("SelectedProduct")
selectedBinding.Mode = BindingMode.TwoWay
GcSpreadGrid1.SetBinding(GcSpreadGrid.SelectedItemProperty, selectedBinding)
// 選択行にViewModelのSelectedProductプロパティをバインドします。
Binding selectedBinding = new Binding("SelectedProduct");
selectedBinding.Mode = BindingMode.TwoWay;
gcSpreadGrid1.SetBinding(GcSpreadGrid.SelectedItemProperty, selectedBinding);
そして、SPREADのボタン型セルにコマンドを設定します。ここでは、3列目にボタン型セルを設定します。ButtonCellTypeオブジェクトを作成し、CommandプロパティにはGetPriceCommandを、CustomCommandParameterプロパティには、ProductViewModelクラスのインスタンスを設定します。ボタン型セルの設定は、コードビハインドの方がわかりやすいです。
Class MainWindow
    Sub New()
        InitializeComponent()

        Dim viewModel As New ProductViewModel()
        Me.DataContext = viewModel

        ' 列の自動生成を無効にします。
        GcSpreadGrid1.AutoGenerateColumns = False

        ' Code、Name列のみ表示します。
        GcSpreadGrid1.Columns(0).DataField = New PropertyDataField() With {.Property = "Code"}
        GcSpreadGrid1.Columns(1).DataField = New PropertyDataField() With {.Property = "Name"}

        ' SPREADとビューモデルのデータコレクションをバインドします。
        Dim spreadBinding As New Binding("Products")
        GcSpreadGrid1.SetBinding(GcSpreadGrid.ItemsSourceProperty, spreadBinding)

        ' 選択行にビューモデルのSelectedProductプロパティをバインドします。
        Dim selectedBinding = New Binding("SelectedProduct")
        selectedBinding.Mode = BindingMode.TwoWay
        GcSpreadGrid1.SetBinding(GcSpreadGrid.SelectedItemProperty, selectedBinding)

        ' ボタン型セルを作成します。
        Dim Button As New ButtonCellType()
        Button.Content = "値段"
        ' ボタンにコマンドを設定します。
        Button.Command = New GetPriceCommand()
        Button.CustomCommandParameter = viewModel
        GcSpreadGrid1.Columns(2).CellType = Button
    End Sub
End Class
public MainWindow()
{
    InitializeComponent();

    ProductViewModel viewModel = new ProductViewModel();
    this.DataContext = viewModel;

    // 列の自動生成を無効にします。
    gcSpreadGrid1.AutoGenerateColumns = false;

    // Code、Name列のみ表示します。
    gcSpreadGrid1.Columns[0].DataField = new PropertyDataField() { Property = "Code" };
    gcSpreadGrid1.Columns[1].DataField = new PropertyDataField() { Property = "Name" };

    // SPREADとビューモデルのデータコレクションをバインドします。
    Binding spreadBinding = new Binding("Products");
    gcSpreadGrid1.SetBinding(GcSpreadGrid.ItemsSourceProperty, spreadBinding);

    // 選択行にビューモデルのSelectedProductプロパティをバインドします。
    Binding selectedBinding = new Binding("SelectedProduct");
    selectedBinding.Mode = BindingMode.TwoWay;
    gcSpreadGrid1.SetBinding(GcSpreadGrid.SelectedItemProperty, selectedBinding);

    // ボタン型セルを作成します。
    ButtonCellType button = new ButtonCellType();
    button.Content = "値段";
    // ボタンにコマンドを設定します。
    button.Command = new GetPriceCommand();
    button.CustomCommandParameter = viewModel;
    gcSpreadGrid1.Columns[2].CellType = button;
}
XAMLでボタン型セルにコマンドを設定するには、コマンドをリソースとして定義します。また、DataContextに設定しているProductViewModelクラスに名前をつけて、CustomCommandParameterプロパティに設定します。
<Window.DataContext>
    <local:ProductViewModel x:Name="productViewModel" />
</Window.DataContext>
<Window.Resources>
    <local:GetPriceCommand x:Key="getPriceCommand" />
</Window.Resources>
<StackPanel>
    <sg:GcSpreadGrid x:Name="gcSpreadGrid1" ItemsSource="{Binding Products}" SelectedItem="{Binding SelectedProduct, Mode=TwoWay}" AutoGenerateColumns="False">
        <sg:GcSpreadGrid.Columns>
            <sg:Column>
                <sg:Column.DataField>
                    <sg:PropertyDataField Property="Code" />
                </sg:Column.DataField>
            </sg:Column>
            <sg:Column>
                <sg:Column.DataField>
                    <sg:PropertyDataField Property="Name" />
                </sg:Column.DataField>
            </sg:Column>
            <sg:Column>
                <sg:Column.CellType>
                    <sg:ButtonCellType Content="価格" Command="{StaticResource getPriceCommand}" CustomCommandParameter="{x:Reference productViewModel}"  />
                </sg:Column.CellType>
            </sg:Column>
        </sg:GcSpreadGrid.Columns>
    </sg:GcSpreadGrid>
</StackPanel>
以上で完成です。実行し、知りたい製品の「値段」ボタンをクリックすると、次のように表示されます。