


データストアにデータを保存する
プロジェクトの作成
以下の設定でGWTプロジェクトを作成してください。GWTプロジェクトの作成手順については、第1回の解説を参照してください。今回は日本語(2バイトコード)を扱いたいので、言語設定は必ず[UTF-8]に設定します。
| Project name | Put |
| Package | com.daisukeyamashita.test.jdo |
プログラムの作成
データストアに保存するデータクラス(ここではStoreDataクラス)を定義します。
package com.daisukeyamashita.test.jdo.server;

import javax.jdo.annotations.IdGeneratorStrategy;
import javax.jdo.annotations.IdentityType;
import javax.jdo.annotations.PersistenceCapable;
import javax.jdo.annotations.Persistent;
import javax.jdo.annotations.PrimaryKey;

@PersistenceCapable(identityType = IdentityType.APPLICATION)
public class StoreData {

    @PrimaryKey
    @Persistent(valueStrategy = IdGeneratorStrategy.IDENTITY)
    private Long id;
    @Persistent
    private String name;
    @Persistent
    private Integer data;

    public StoreData(String name, Integer data) {
        this.name = name;
        this.data = data;
    }
}
PersistenceManagerは1回だけインスタンスの生成をすれば良いので、次のようなヘルパークラスを用意する方が便利です。今回のプログラムでもこのヘルパークラスを使います。
package com.daisukeyamashita.test.jdo.server;

import javax.jdo.JDOHelper;
import javax.jdo.PersistenceManagerFactory;

public class PMF {

    private static final PersistenceManagerFactory pmfInstance = JDOHelper
        .getPersistenceManagerFactory("transactions-optional");

    private PMF() {
    }

    public static PersistenceManagerFactory get() {
        return pmfInstance;
    }
}
続いて、GWTのAjax通信用のクライアントサイドのソースコードを定義します。
package com.daisukeyamashita.test.jdo.client;

import com.google.gwt.user.client.rpc.RemoteService;
import com.google.gwt.user.client.rpc.RemoteServiceRelativePath;

/**
 * The client side stub for the RPC service.
 */
@RemoteServiceRelativePath("greet")
public interface GreetingService extends RemoteService {
    void store(String name, Integer data);
}
package com.daisukeyamashita.test.jdo.client;

import com.google.gwt.user.client.rpc.AsyncCallback;

/**
 * The async counterpart of <code>GreetingService</code>.
 */
public interface GreetingServiceAsync {
    void store(String name, Integer data, AsyncCallback callback);
}
GWTのAjax通信のサーバサイド部分のソースコードを定義します。ここで、データをデータクラスに設定して、永続化しています。
package com.daisukeyamashita.test.jdo.server;

import javax.jdo.PersistenceManager;

import com.daisukeyamashita.test.jdo.client.GreetingService;
import com.google.gwt.user.server.rpc.RemoteServiceServlet;

/**
 * The server side implementation of the RPC service.
 */
@SuppressWarnings("serial")
public class GreetingServiceImpl extends RemoteServiceServlet implements GreetingService {

    public void store(String name, Integer data) {
        StoreData storeData = new StoreData(name, data);
        PersistenceManager pm = PMF.get().getPersistenceManager();
        try {
            pm.makePersistent(storeData);
        } finally {
            pm.close();
        }
    }
}
クライアント部分のソースコードを定義します。
package com.daisukeyamashita.test.jdo.client;

import com.google.gwt.core.client.EntryPoint;
import com.google.gwt.core.client.GWT;
import com.google.gwt.event.dom.client.ClickEvent;
import com.google.gwt.event.dom.client.ClickHandler;
import com.google.gwt.user.client.rpc.AsyncCallback;
import com.google.gwt.user.client.ui.Button;
import com.google.gwt.user.client.ui.DialogBox;
import com.google.gwt.user.client.ui.HTML;
import com.google.gwt.user.client.ui.Label;
import com.google.gwt.user.client.ui.RootPanel;
import com.google.gwt.user.client.ui.TextBox;
import com.google.gwt.user.client.ui.VerticalPanel;

/**
 * Entry point classes define <code>onModuleLoad()</code>.
 */
public class Put implements EntryPoint {

    /**
     * Create a remote service proxy to talk to the server-side Greeting service.
     */
    private final GreetingServiceAsync greetingService = GWT.create(GreetingService.class);

    /**
     * This is the entry point method.
     */
    public void onModuleLoad() {
        final TextBox tbName = new TextBox();
        tbName.setText("蕎麦");

        final TextBox tbData = new TextBox();
        tbData.setText("10");

        final Button btnStore = new Button("store");

        final DialogBox dialogBox = new DialogBox();
        dialogBox.setText("Remote Procedure Call");
        dialogBox.setAnimationEnabled(true);
        final Button closeButton = new Button("Close");
        // We can set the id of a widget by accessing its Element
        closeButton.getElement().setId("closeButton");
        final Label lblServerResponse = new Label();
        VerticalPanel dialogVPanel = new VerticalPanel();
        dialogVPanel.addStyleName("dialogVPanel");
        dialogVPanel.add(lblServerResponse);
        dialogVPanel.setHorizontalAlignment(VerticalPanel.ALIGN_RIGHT);
        dialogVPanel.add(closeButton);
        dialogBox.setWidget(dialogVPanel);

        // Add a handler to close the DialogBox
        closeButton.addClickHandler(new ClickHandler() {
            public void onClick(ClickEvent event) {
                dialogBox.hide();
                btnStore.setEnabled(true);
                btnStore.setFocus(true);
            }
        });

        btnStore.addClickHandler(new ClickHandler() {

            public void onClick(ClickEvent event) {
                btnStore.setEnabled(false);
                btnStore.setFocus(false);
                int data = Integer.parseInt(tbData.getText());
                greetingService.store(tbName.getText(), data, new AsyncCallback() {

                    public void onSuccess(Object result) {
                        lblServerResponse.setText("Success");
                        dialogBox.center();
                    }

                    public void onFailure(Throwable caught) {
                        lblServerResponse.setText("Failure");
                        caught.printStackTrace();
                    }
                });
            }
        });
        RootPanel.get("nameFieldContainer").add(tbName);
        RootPanel.get("dataFieldContainer").add(tbData);
        RootPanel.get("storeButtonContainer").add(btnStore);
    }
}
最後に「war/Put.html」の下から4行目にある</tr>タグの直前にある<td>タグを以下の3行に書き換えてください。
<td id="nameFieldContainer"></td>
<td id="dataFieldContainer"></td>
<td id="storeButtonContainer"></td>
実行する
これまでの手順で、Datastore Java APIを利用したプログラムが完成しました。プロジェクト名を右クリックして、[Run As]-[Web Application]を選択してください。
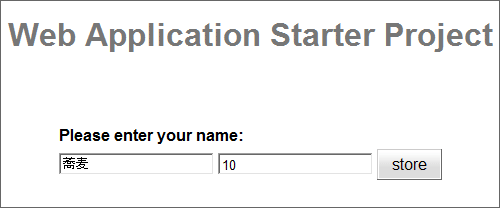
次のように表示されていればOKです。入力ボックスが[蕎麦]と[10]となっていることを確認して、[store]ボタンをクリックします。
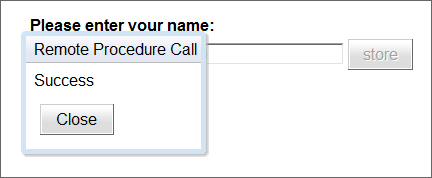
次のようなポップアップウィンドウが表示されたと思います。データストア処理とAjax通信が正常終了していれば、ポップアップウィンドウの中に「Success」と表示されるので、確認してください。
ローカルで正常に動作することが確認できたら、Google App Engineにアプリケーションをデプロイしても同じように動作することを確認してください。
いくつか名前や数字を変更してデータを保存してみてください。保存したデータは、Google App Engine管理コンソールの「Data Viewer」から確認することができます。

データストアの内容を確認する「Data Viewer」ですが、保存したばかりのデータはすぐに見れないことがあります。私の場合で、最大30分ほどデータを確認することができませんでした。ただし、「Data Viewer」でデータが確認できなくても、データストアには正しく保存されていますので、プログラムからデータを引き出すことはできます。

