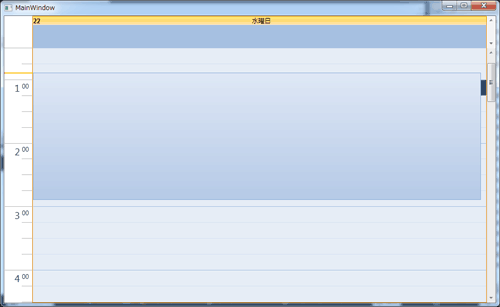
データのマッピングを行い、予定を画面に表示させる
XamDataManager コントロールでは現在のリソース、もしくはリソース ID を CurrentUser, CurrentUserId プロパティに割り当てる必要があります。MainWindow.xaml を開き、MainPageViewModel.CurrentUserId を割り当てます。
<ig:XamScheduleDataManager Name="xamScheduleDataManager1"
                DataConnector="{Binding ElementName=listScheduleDataConnector1}"
                CurrentUserId="{Binding CurrentUserId}"  />
さらに、データ コネクター コントロールでは各種情報のコレクションを設定し、それぞれのプロパティをマッピングする必要があります。割り当てるデータのエンティティ名を標準のものにしている場合は、UseDefaultMappings プロパティを True と設定することであらかじめ定義されたマッピングが設定されます。
<ig:ListScheduleDataConnector Name="listScheduleDataConnector1"
                    AppointmentItemsSource="{Binding Appointments}"
                    ResourceCalendarItemsSource="{Binding ResourceCalendars}"
                    ResourceItemsSource="{Binding Resources}”  >
    <ig:ListScheduleDataConnector.AppointmentPropertyMappings>
        <ig:AppointmentPropertyMappingCollection UseDefaultMappings="True" />
    </ig:ListScheduleDataConnector.AppointmentPropertyMappings>
    <ig:ListScheduleDataConnector.ResourceCalendarPropertyMappings>
        <ig:ResourceCalendarPropertyMappingCollection UseDefaultMappings="True" />
    </ig:ListScheduleDataConnector.ResourceCalendarPropertyMappings>
    <ig:ListScheduleDataConnector.ResourcePropertyMappings>
        <ig:ResourcePropertyMappingCollection UseDefaultMappings="True" />
    </ig:ListScheduleDataConnector.ResourcePropertyMappings>
</ig:ListScheduleDataConnector>
全ての XAML は下記のとおりです。
<Window x:Class="xamSchedule_WPF.MainWindow"
        xmlns=http://schemas.microsoft.com/winfx/2006/xaml/presentation
        xmlns:x=http://schemas.microsoft.com/winfx/2006/xaml
        Title="MainWindow" Height="350" Width="525"
        xmlns:ig="http://schemas.infragistics.com/xaml">
    <Grid>
        <ig:XamDayView Name="xamDayView1"
                     DataManager="{Binding ElementName=xamScheduleDataManager1}" />
        <ig:XamScheduleDataManager Name="xamScheduleDataManager1"
                      DataConnector="{Binding ElementName=listScheduleDataConnector1}"
                      CurrentUserId="{Binding CurrentUserId}" />
        <ig:ListScheduleDataConnector Name="listScheduleDataConnector1"
            AppointmentItemsSource="{Binding Appointments}"
                    ResourceCalendarItemsSource="{Binding ResourceCalendars}"
                    ResourceItemsSource="{Binding Resources}">
            <ig:ListScheduleDataConnector.AppointmentPropertyMappings>
                <ig:AppointmentPropertyMappingCollection UseDefaultMappings="True" />
            </ig:ListScheduleDataConnector.AppointmentPropertyMappings>
            <ig:ListScheduleDataConnector.ResourceCalendarPropertyMappings>
                <ig:ResourceCalendarPropertyMappingCollection UseDefaultMappings="True" />
            </ig:ListScheduleDataConnector.ResourceCalendarPropertyMappings>
            <ig:ListScheduleDataConnector.ResourcePropertyMappings>
                <ig:ResourcePropertyMappingCollection UseDefaultMappings="True" />
            </ig:ListScheduleDataConnector.ResourcePropertyMappings>
        </ig:ListScheduleDataConnector>
    </Grid>
</Window>
xamSchedule_WPF プロジェクトをスタートアップ プロジェクトに設定し、実行すると WPF アプリケーションが起動し、スケジュール表示が可能になります。

ビューの追加
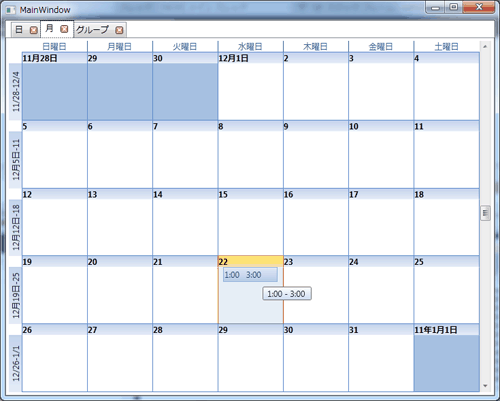
このアプリケーションは 1 日の予定を表示させるだけですが、xamTab コントロールを使用し日、月、横時間軸で表示させる場合は下記のような XAML になります。
<Window x:Class="xamSchedule_WPF.MainWindow"
        xmlns=http://schemas.microsoft.com/winfx/2006/xaml/presentation
        xmlns:x=http://schemas.microsoft.com/winfx/2006/xaml
        Title="MainWindow" Height="350" Width="525"
        xmlns:ig=http://schemas.infragistics.com/xaml
        xmlns:igWindows="http://infragistics.com/Windows">
    <Grid>
        <ig:XamScheduleDataManager Name="xamScheduleDataManager1"
                      DataConnector="{Binding ElementName=listScheduleDataConnector1}"
                                   CurrentUserId="{Binding CurrentUserId}" />
        <ig:ListScheduleDataConnector Name="listScheduleDataConnector1"
            AppointmentItemsSource="{Binding Appointments}"
                    ResourceCalendarItemsSource="{Binding ResourceCalendars}"
                    ResourceItemsSource="{Binding Resources}">
            <ig:ListScheduleDataConnector.AppointmentPropertyMappings>
                <ig:AppointmentPropertyMappingCollection UseDefaultMappings="True" />
            </ig:ListScheduleDataConnector.AppointmentPropertyMappings>
            <ig:ListScheduleDataConnector.ResourceCalendarPropertyMappings>
                <ig:ResourceCalendarPropertyMappingCollection UseDefaultMappings="True" />
            </ig:ListScheduleDataConnector.ResourceCalendarPropertyMappings>
            <ig:ListScheduleDataConnector.ResourcePropertyMappings>
                <ig:ResourcePropertyMappingCollection UseDefaultMappings="True" />
            </ig:ListScheduleDataConnector.ResourcePropertyMappings>
        </ig:ListScheduleDataConnector>
        <igWindows:XamTabControl Name="xamTabControl1" TabItemCloseButtonVisibility="Visible">
            <igWindows:TabItemEx Header="日u" Name="tabItemEx1">
                <ig:XamDayView Name="xamDayView1"
                       DataManager="{Binding ElementName=xamScheduleDataManager1}" />
            </igWindows:TabItemEx>
            <igWindows:TabItemEx Header="月?" Name="tabItemEx2">
                <ig:XamMonthView Name="xamMonthView1"
                       DataManager="{Binding ElementName=xamScheduleDataManager1}" />
            </igWindows:TabItemEx>
            <igWindows:TabItemEx Header="グOル?ー[プv" Name="tabItemEx3">
                <ig:XamScheduleView Name="xamScheduleView1"
                       DataManager="{Binding ElementName=xamScheduleDataManager1}" />
            </igWindows:TabItemEx>
        </igWindows:XamTabControl>
    </Grid>
</Window>
実行すると各タブに別々のビューが表示され、予定については全てのビューで共有されています。

まとめ
今回は Silverlight クラス ライブラリで実装していたスケジュール データ構造を Silverlight 4 と .NET4 のアセンブリ共有の仕組みを利用し、NetAdvantage for WPF LOB のスケジュールコントロールで使用しました。WPF 側のデータ ロジック クラスについては全く同じロジックを使用していますので、両プラットフォーム間でのポータビリティの高さをご覧いただけたかと思います。WPF, Silverlight どちらにおいてもスケジュール管理ソリューションを開発できる可能性が高まりましたので、ぜひ試してください。


