はじめに
NetAdvantage for Silverlight LOB / NetAdvantage for WPF LOB にはスケジュールを管理するために活用できる、xamSchedule コントロールが含まれています。この xamSchedule コントロールを活用することで Microsoft Outlook ライクなスケジュール表示を行うことが可能です。前回は Silverlight での実装をご紹介しましたが、今回は WPF を使用し、スケジュール画面を構築します。なお、xamSchedule の特徴やデータ構造については前回の記事を参照してください。
対象読者
Visual Basic 2010, Visual C# 2010, Expression Blend 4, XAML を使ってプログラミングをしたことのある人。XAML プラットフォームにおいてのデータ バインディングについて基本的な理解を持っている人
必要環境
Visual Basic 2010 あるいは Visual C# 2010, Expression Blend 4 でプログラムが作れる環境。サンプルは Visual Studio 2010 Ultimate, Silverlight 4, WPF4 にて作成しています。また、Windows 7 Ultimate 64bit 版において動作を検証しています。
プログラム実行時の注意環境
Silverlight 4 の場合
あらかじめ Silverlight 4 Tools for Visual Studio 2010 がインストールされていることを確認してください。インストーラーはこちらより入手可能です。サンプル ソリューションを Visual Studio 2010 または Expression Blend 4 で開き実行します。
WPF4 の場合
あらかじめ、.NET Framework 4 ランタイムがインストールされていることを確認してください(Visual Studio 2010 セットアップ時に自動的にインストールされます)。単体のランタイムはこちらより入手可能です。
コンポーネントのインストールならびに製品ラインナップ
はじめて NetAdvantage for Silverlight LOB, NetAdvantage for WPF LOB を使用する場合は、事前にソフトウェアをインストールする必要があります。インフラジスティックス社の Web ページからインストーラーをダウンロードしてください。両プラットフォームを含め、すべてのプラットフォーム対応版をインストールする場合、NetAdvantage Ultimate を選択し、こちらからダウンロードを行います(サイトへの登録が必要になります)。NetAdvantage Ultimate 2010 Volume 3 Complete はサンプル、ヘルプ全てを含んでおり、NetAdvantage Ultimate 2010 Volume 3 Full はコントロールのみ含まれています。この製品は有償ですが、20日間全ての機能を使用できるトライアル版として利用が可能です。
NetAdvantage for Silverlight LOB, NetAdvantage for WPF LOB について
Silverlight 版 は 2009 年に日本初の Silverlight 対応コンポーネントとして、WPF 版は 2007 年に世界初の WPF 対応コンポーネントとして発売が開始され、原稿執筆時点での日本語版最新バージョンは 2010 Volume 3 となります。収録されているコントロールの特徴として、高機能、高パフォーマンスを実現したデータグリッド、ツリー、チャート、そして今回紹介するスケジュール コントロールを備え、リッチクライアント、RIA 開発の効率を高めます。また、2010 Volume 2 より両プラットフォームでのソースコード統合が図られ、プラットフォーム間でのポータビリティが向上しました。製品サンプルについてはこちらからオンラインで確認することも可能です。
Silverlight 4, WPF4 のアセンブリ共有について
Silverlight 4 並びに WPF 4 では特定のアセンブリにおいてバイナリ レベルでの共有が行えるようになりました。対象のアセンブリは下記の通りです。
- Mscorlib
- System
- System.Core
- System.ComponentModel.Composition
- Microsoft.VisualBasic
今回はこの仕組みを使用し、前回作成した ScheduleDataViewModel プロジェクトから生成されたアセンブリを WPF プロジェクトで活用します。
WPF ソリューションを作成し、ScheduleDataViewModel アセンブリの参照を追加
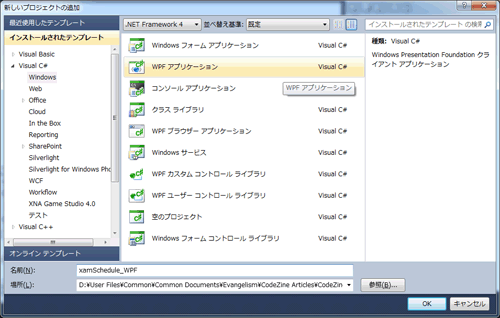
まず、前回の記事から xamSchedule_1.zip ソリューションをダウンロードし、 Visual Studio で開きます。その後、新しい WPF アプリケーション プロジェクトを “xamSchedule_WPF” と名前を設定し、作成します。
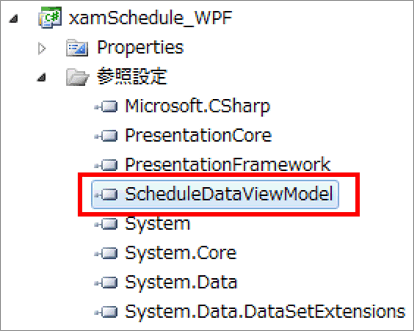
次にソリューションの参照設定でコンテキスト メニューを表示し、[参照の追加]を選択します。参照の追加ダイアログが表示されるので[参照]タブを選択し、ScheduleDataViewModel.dll を選択します。
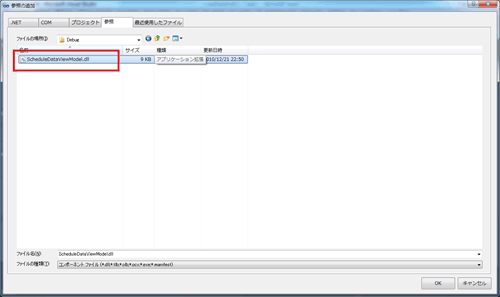
これで WPF アプリケーション プロジェクトで Silverlight クラス ライブラリ プロジェクトのアセンブリを使用できるようになりました。
XamDayView コントロールを画面に追加
MainWindow.xaml を開き前回同様、ツール ボックスから XamDayView コントロール、XamScheduleDataManager コントロール、ListScheduleDataConnector コントロールを追加します。
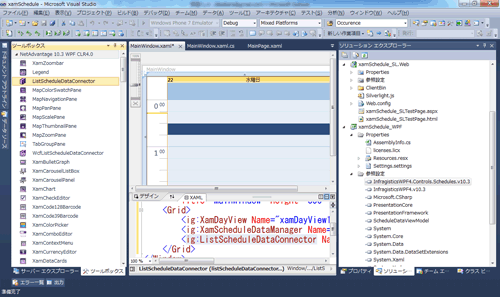
XamDayView コントロールを追加すると、プロジェクトには次のアセンブリが追加されます。
- InfragisticsWPF4.v10.3.dll
- InfragisticsWPF4.Controls.Schedules.v10.3.dll
<Window x:Class="xamSchedule_WPF.MainWindow"
        xmlns=http://schemas.microsoft.com/winfx/2006/xaml/presentation
        xmlns:x=http://schemas.microsoft.com/winfx/2006/xaml
        Title="MainWindow" Height="350" Width="525"
        xmlns:ig="http://schemas.infragistics.com/xaml">
    <Grid>
        <ig:XamDayView Name="xamDayView1" />
        <ig:XamScheduleDataManager Name="xamScheduleDataManager1" />
        <ig:ListScheduleDataConnector Name="listScheduleDataConnector1" />
    </Grid>
</Window>
追加した XamDayView コントロールの DataManager プロパティに先ほど追加した XamScheduleDataManager コントロールをバインドします。
<ig:XamDayView Name="xamDayView1"
               DataManager="{Binding ElementName=xamScheduleDataManager1}" />
XamScheduleDataManager ではデータ コネクターを指定します。
<ig:XamScheduleDataManager Name="xamScheduleDataManager1"
               DataConnector="{Binding ElementName=listScheduleDataConnector1}"/>
これで、ビュー – データ マネージャー – データ コネクター の接続が完了しました。
画面に表示させるデータをコードで生成する
画面に表示させるデータを作成するため、xamSchedule_WPF プロジェクトに新しいフォルダーを “ViewModels” と名付け作成し、そのフォルダー内に新しいクラスを “MainWindowViewModel.cs” と名付け、作成します。
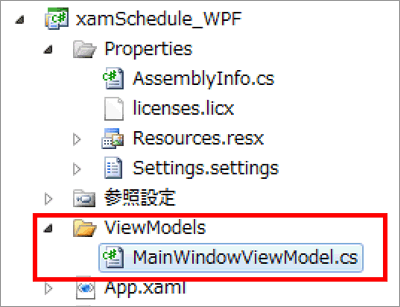
このクラスの実装は前回の MainPageViewModel.cs クラスとまったく同じものを流用可能です。
using ScheduleDataViewModel;
using System.Collections.ObjectModel;
using System;

namespace xamSchedule_WPF.ViewModels
{
    public class MainWindowViewModel : ViewModelBase
    {
        #region プロパティ

        private ObservableCollection<ResourceInfo> _resources;
        public ObservableCollection<ResourceInfo> Resources
        {
            get { return _resources; }
            set
            {
                _resources = value;
                OnPropertyChanged("Resources");
            }
        }

        private ObservableCollection<ResourceCalendarInfo> _resourceCalendars;
        public ObservableCollection<ResourceCalendarInfo> ResourceCalendars
        {
            get { return _resourceCalendars; }
            set
            {
                _resourceCalendars = value;
                OnPropertyChanged("ResourceCalendars");
            }
        }

        private ObservableCollection<AppointmentInfo> _appointments;
        public ObservableCollection<AppointmentInfo> Appointments
        {
            get { return _appointments; }
            set
            {
                _appointments = value;
                OnPropertyChanged("Appointments");
            }
        }

        private string _currentUserId;
        public string CurrentUserId
        {
            get { return _currentUserId; }
            set
            {
                _currentUserId = value;
                OnPropertyChanged("CurrentUserId");
            }
        }

        #endregion
            // 省略
    }
}
次にコンストラクタを実装します。今回の記事ではコードでデータを作成します。ここでの注意点としては、予定の開始時刻、終了時刻は世界標準時であるということです。
using ScheduleDataViewModel;
using System.Collections.ObjectModel;
using System;

namespace xamSchedule_WPF.ViewModels
{
    public class MainWindowViewModel : ViewModelBase
    {
        #region プロパティ
            // 省略
        #endregion

        #region コンストラクタ
        public MainWindowViewModel()
        {
            // リソースを作成
            Resources = new ObservableCollection<ResourceInfo>();
            Resources.Add(new ResourceInfo()
            {
                Id = "R0001",
                PrimaryResourceCalendarId = "C0001"
            });

            // リソースカレンダーを作成
            ResourceCalendars = new ObservableCollection<ResourceCalendarInfo>();
            ResourceCalendars.Add(new ResourceCalendarInfo()
            {
                Id = "C0001",
                OwningResourceId = "R0001"
            });

            // 予定を追加
            Appointments = new ObservableCollection<AppointmentInfo>();
            Appointments.Add(new AppointmentInfo()
            {
                Id = "A0001",
                OwningCalendarId = "C0001",
                OwningResourceId = "R0001",
                Start = DateTime.Now.ToUniversalTime(),
                End = DateTime.Now.AddHours(2).ToUniversalTime(),
            });

            // 現在のユーザー ID を指定
            this.CurrentUserId = this.Resources[0].Id;
        }
        #endregion
    }
}
この MainWindowViewModel を実行時に MainWindow の DataContext に格納します。そのため、MainWindow.xaml.cs を開き、コンストラクタで MainWindowViewModel のインスタンスを作成します。
using System.Windows;
using xamSchedule_WPF.ViewModels;

namespace xamSchedule_WPF
{
    public partial class MainWindow : Window
    {
        public MainWindow()
        {
            InitializeComponent();
            MainWindowViewModel vm = new MainWindowViewModel();
            this.DataContext = vm;
        }
    }
}
これでスケジュールに表示させるためのデータの作成が完了しました。
データのマッピングを行い、予定を画面に表示させる
XamDataManager コントロールでは現在のリソース、もしくはリソース ID を CurrentUser, CurrentUserId プロパティに割り当てる必要があります。MainWindow.xaml を開き、MainPageViewModel.CurrentUserId を割り当てます。
<ig:XamScheduleDataManager Name="xamScheduleDataManager1"
                DataConnector="{Binding ElementName=listScheduleDataConnector1}"
                CurrentUserId="{Binding CurrentUserId}"  />
さらに、データ コネクター コントロールでは各種情報のコレクションを設定し、それぞれのプロパティをマッピングする必要があります。割り当てるデータのエンティティ名を標準のものにしている場合は、UseDefaultMappings プロパティを True と設定することであらかじめ定義されたマッピングが設定されます。
<ig:ListScheduleDataConnector Name="listScheduleDataConnector1"
                    AppointmentItemsSource="{Binding Appointments}"
                    ResourceCalendarItemsSource="{Binding ResourceCalendars}"
                    ResourceItemsSource="{Binding Resources}”  >
    <ig:ListScheduleDataConnector.AppointmentPropertyMappings>
        <ig:AppointmentPropertyMappingCollection UseDefaultMappings="True" />
    </ig:ListScheduleDataConnector.AppointmentPropertyMappings>
    <ig:ListScheduleDataConnector.ResourceCalendarPropertyMappings>
        <ig:ResourceCalendarPropertyMappingCollection UseDefaultMappings="True" />
    </ig:ListScheduleDataConnector.ResourceCalendarPropertyMappings>
    <ig:ListScheduleDataConnector.ResourcePropertyMappings>
        <ig:ResourcePropertyMappingCollection UseDefaultMappings="True" />
    </ig:ListScheduleDataConnector.ResourcePropertyMappings>
</ig:ListScheduleDataConnector>
全ての XAML は下記のとおりです。
<Window x:Class="xamSchedule_WPF.MainWindow"
        xmlns=http://schemas.microsoft.com/winfx/2006/xaml/presentation
        xmlns:x=http://schemas.microsoft.com/winfx/2006/xaml
        Title="MainWindow" Height="350" Width="525"
        xmlns:ig="http://schemas.infragistics.com/xaml">
    <Grid>
        <ig:XamDayView Name="xamDayView1"
                     DataManager="{Binding ElementName=xamScheduleDataManager1}" />
        <ig:XamScheduleDataManager Name="xamScheduleDataManager1"
                      DataConnector="{Binding ElementName=listScheduleDataConnector1}"
                      CurrentUserId="{Binding CurrentUserId}" />
        <ig:ListScheduleDataConnector Name="listScheduleDataConnector1"
            AppointmentItemsSource="{Binding Appointments}"
                    ResourceCalendarItemsSource="{Binding ResourceCalendars}"
                    ResourceItemsSource="{Binding Resources}">
            <ig:ListScheduleDataConnector.AppointmentPropertyMappings>
                <ig:AppointmentPropertyMappingCollection UseDefaultMappings="True" />
            </ig:ListScheduleDataConnector.AppointmentPropertyMappings>
            <ig:ListScheduleDataConnector.ResourceCalendarPropertyMappings>
                <ig:ResourceCalendarPropertyMappingCollection UseDefaultMappings="True" />
            </ig:ListScheduleDataConnector.ResourceCalendarPropertyMappings>
            <ig:ListScheduleDataConnector.ResourcePropertyMappings>
                <ig:ResourcePropertyMappingCollection UseDefaultMappings="True" />
            </ig:ListScheduleDataConnector.ResourcePropertyMappings>
        </ig:ListScheduleDataConnector>
    </Grid>
</Window>
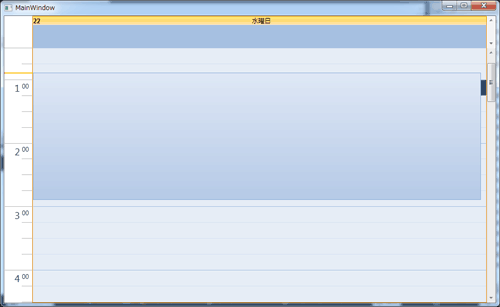
xamSchedule_WPF プロジェクトをスタートアップ プロジェクトに設定し、実行すると WPF アプリケーションが起動し、スケジュール表示が可能になります。
ビューの追加
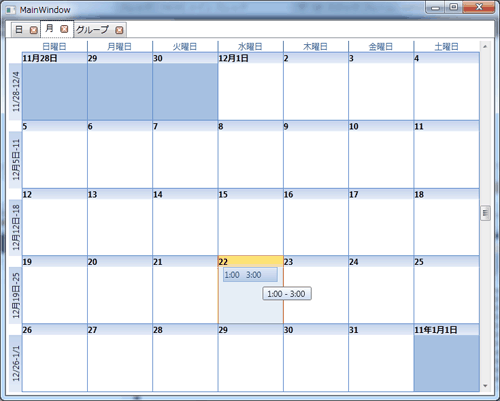
このアプリケーションは 1 日の予定を表示させるだけですが、xamTab コントロールを使用し日、月、横時間軸で表示させる場合は下記のような XAML になります。
<Window x:Class="xamSchedule_WPF.MainWindow"
        xmlns=http://schemas.microsoft.com/winfx/2006/xaml/presentation
        xmlns:x=http://schemas.microsoft.com/winfx/2006/xaml
        Title="MainWindow" Height="350" Width="525"
        xmlns:ig=http://schemas.infragistics.com/xaml
        xmlns:igWindows="http://infragistics.com/Windows">
    <Grid>
        <ig:XamScheduleDataManager Name="xamScheduleDataManager1"
                      DataConnector="{Binding ElementName=listScheduleDataConnector1}"
                                   CurrentUserId="{Binding CurrentUserId}" />
        <ig:ListScheduleDataConnector Name="listScheduleDataConnector1"
            AppointmentItemsSource="{Binding Appointments}"
                    ResourceCalendarItemsSource="{Binding ResourceCalendars}"
                    ResourceItemsSource="{Binding Resources}">
            <ig:ListScheduleDataConnector.AppointmentPropertyMappings>
                <ig:AppointmentPropertyMappingCollection UseDefaultMappings="True" />
            </ig:ListScheduleDataConnector.AppointmentPropertyMappings>
            <ig:ListScheduleDataConnector.ResourceCalendarPropertyMappings>
                <ig:ResourceCalendarPropertyMappingCollection UseDefaultMappings="True" />
            </ig:ListScheduleDataConnector.ResourceCalendarPropertyMappings>
            <ig:ListScheduleDataConnector.ResourcePropertyMappings>
                <ig:ResourcePropertyMappingCollection UseDefaultMappings="True" />
            </ig:ListScheduleDataConnector.ResourcePropertyMappings>
        </ig:ListScheduleDataConnector>
        <igWindows:XamTabControl Name="xamTabControl1" TabItemCloseButtonVisibility="Visible">
            <igWindows:TabItemEx Header="日u" Name="tabItemEx1">
                <ig:XamDayView Name="xamDayView1"
                       DataManager="{Binding ElementName=xamScheduleDataManager1}" />
            </igWindows:TabItemEx>
            <igWindows:TabItemEx Header="月?" Name="tabItemEx2">
                <ig:XamMonthView Name="xamMonthView1"
                       DataManager="{Binding ElementName=xamScheduleDataManager1}" />
            </igWindows:TabItemEx>
            <igWindows:TabItemEx Header="グOル?ー[プv" Name="tabItemEx3">
                <ig:XamScheduleView Name="xamScheduleView1"
                       DataManager="{Binding ElementName=xamScheduleDataManager1}" />
            </igWindows:TabItemEx>
        </igWindows:XamTabControl>
    </Grid>
</Window>
実行すると各タブに別々のビューが表示され、予定については全てのビューで共有されています。
まとめ
今回は Silverlight クラス ライブラリで実装していたスケジュール データ構造を Silverlight 4 と .NET4 のアセンブリ共有の仕組みを利用し、NetAdvantage for WPF LOB のスケジュールコントロールで使用しました。WPF 側のデータ ロジック クラスについては全く同じロジックを使用していますので、両プラットフォーム間でのポータビリティの高さをご覧いただけたかと思います。WPF, Silverlight どちらにおいてもスケジュール管理ソリューションを開発できる可能性が高まりましたので、ぜひ試してください。


