





いよいよ登場! WPFをブレイクスルーする魅惑のコンポーネント「SPREAD for WPF 1.0J」
「SPREAD for WPF 1.0J」の1レコード複数行表示機能

ダウンロード サンプルファイル (18.1 KB)
APIの呼び出し
商品検索APIは、「http://api.coneco.net/cws/v1/SearchProducts_json?apikey=xxxx&categoryId=10120&sort=ranking」のようなURLにアクセスして行います。
キーワード検索を行うときは、このURLの後ろに、「&freeword=キーワード」のパラメータを付与します。
このようにして組み立てたURLを指定し、GetStringAsyncを実行してJSON形式のデータを受信します。
Public Class ConecoContext
    Public Property Ranking As String
    Public Property ComId As String
    Public Property Name As String
    Public Property Manufacturer As String
    Public Property LowestPrice As String
    Public Property HighestPrice As String
    Public Property CPU As String
    Public Property Disk As String
    Public Property Memory As String
    Public Property Display As String
    Public Property ImageUrl As String
    Public Property Img As BitmapImage
End Class

Public Class ConecoModel
    Implements INotifyPropertyChanged

    Public Property Items As New List(Of ConecoContext)        :
       (略)
        :
    Private Sub GetItemContext(ByVal result As String)
        Using Stream As New MemoryStream(System.Text.Encoding.UTF8.GetBytes(result))
            Dim serializer As New DataContractJsonSerializer(GetType(ResultContext.TResult))
            Dim jsonDataValue As ResultContext.TResult =
                CType(serializer.ReadObject(Stream), ResultContext.TResult)
            Me.Items =
                (From item In jsonDataValue.Item
                Where item.SellerCount > 0
                Order By CType(IIf(item.CategoryRanking.Length = 0,
                                    Integer.MaxValue,
                                    item.CategoryRanking), Integer)
                Select New ConecoContext With {
                    .Ranking = item.CategoryRanking,
                    .ComId = item.ComId,
                    .Name = item.Name,
                    .Manufacturer = item.Manufacturer,
                    .LowestPrice = item.LowestPrice,
                    .HighestPrice = item.HighestPrice,
                    .CPU = item.Specifications(0).Spec,
                    .Disk = item.Specifications(2).Spec,
                    .Memory = item.Specifications(3).Spec,
                    .Display = item.Specifications(4).Spec,
                    .ImageUrl = item.ImageUrl,
                    .Img = New BitmapImage(New Uri(item.ImageUrl))
                }).ToList
        End Using
    End Sub
        :
       (略)
        :
End Class
このコードにより、Itemsプロパティに画面表示に必要なデータがセットできます。
画面側コード
MainWindow.xaml.vbでは、ConecoModelと連結したMainViewModelをDataContextに割り当てるコードだけが必要です。
Class MainWindow
    Private WithEvents ViewModel As New MainViewModel

    Public Sub New()
        InitializeComponent()

        Me.DataContext = Me.ViewModel
        Me.ViewModel.GetItems.Execute("")
    End Sub
End Class
あとはXAML定義でSPREADにItemsをBindingしましょう。
<Window
    x:Class="MainWindow"
    xmlns="http://schemas.microsoft.com/winfx/2006/xaml/presentation"
    xmlns:x="http://schemas.microsoft.com/winfx/2006/xaml"
    xmlns:sg="http://schemas.grapecity.com/windows/spreadgrid/2012"
    Title="MainWindow" Height="350" Width="525">
    <Grid>
        <sg:GcSpreadGrid HorizontalAlignment="Left"
                         VerticalAlignment="Top"
                         DocumentUri="/CZ1211SpreadWPF;component/document1.sgxml"
                         ItemsSource="{Binding Items}" />
    </Grid>
</Window>
実行
この状態でどのような表示になるか実行してみましょう。
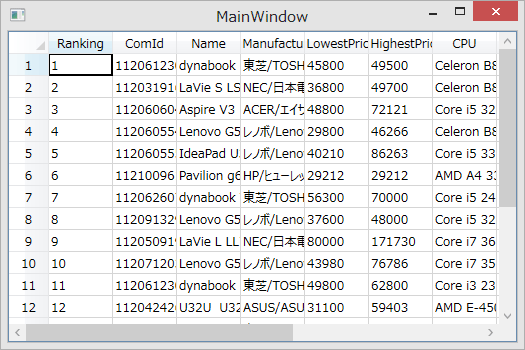
正しい結果が表示されているように見えますが、よく見るとタイトルがプロパティ名に変わっていますし、2列目も商品画像の列ではありません。
これはSPREADのAutoGenerateColumnsプロパティの省略値が、Trueであることと関係しています。このプロパティは、割り当てられたリストの各要素を自動的にSPREADの列に展開してくれる優れものですが、今回のケースではこの機能が働くのは望むべき動きではありません。そこで、AutoGenerateColumnsにFalseを設定して動きを止めたいと思います。
WindowsフォームではプログラムコードでFalseを設定していたと思いますが、WPFではXAMLで定義するのが良いでしょう。
<Window
    x:Class="MainWindow"
    xmlns="http://schemas.microsoft.com/winfx/2006/xaml/presentation"
    xmlns:x="http://schemas.microsoft.com/winfx/2006/xaml"
    xmlns:sg="http://schemas.grapecity.com/windows/spreadgrid/2012"
    Title="MainWindow" Height="350" Width="525">
    <Grid>
        <sg:GcSpreadGrid HorizontalAlignment="Left"
                         VerticalAlignment="Top"
                         DocumentUri="/CZ1211SpreadWPF;component/document1.sgxml"
                         ItemsSource="{Binding Items}"
                         AutoGenerateColumns="False" />
    </Grid>
</Window>
それでは再度実行してみましょう。
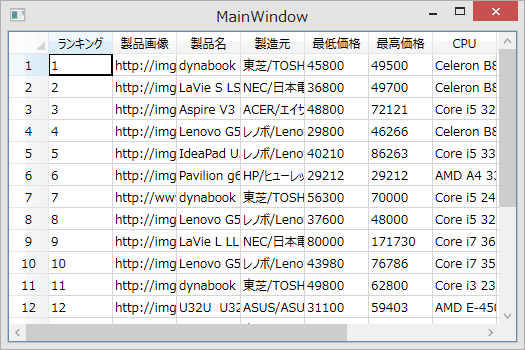
今度は設定したヘッダなども、意図した通りにデータが表示されました。
とはいえ、ランキングや最低価格、最高価格などは右寄せにしたいですし、製品画像はURLではなく、画像を表示したいところです。次はこの辺りを設定してみましょう。
- 修正履歴
-
- 2012/12/28 10:25 サンプルファイルを再修正させていただきました。
- 2012/12/27 10:40 サンプルファイルを一部更新しました
この記事は参考になりましたか?
- 現役エンジニア直伝! 「現場」で使えるコンポーネント活用術(SPREAD)連載記事一覧
- この記事の著者
-

初音玲(ハツネアキラ)
国内SIerのSEでパッケージ製品開発を主に行っており、最近は、空間認識や音声認識などを応用した製品を手掛けています。 個人的には、仕事の内容をさらに拡張したHoloLensなどのMRを中心に活動しています。 Microsoft MVP for Windows Development ブログ:http://hatsune.hatenablog.jp/
※プロフィールは、執筆時点、または直近の記事の寄稿時点での内容です

この記事は参考になりましたか?
この記事をシェア