はじめに
前回は、データストアに関連オブジェクトを含むレコードを保存して、取得してみました。やるべきタスクの名前を登録したTaskClassからボタンを複数作成して、そのボタンをタップすると、そのタスクを開始したことを表すCurTaskClassにレコードを作成するようにプログラムを作成しました。
CurTaskClassはフィールドとしてTaskClassのオブジェクトへの参照を持ちます。そして、選択したタスクのボタンを再度、タップすると開始日時と終了日時、そして、その差分を分単位で記録した経過時間、ログインしているユーザー名、それから、TaskClassのオブジェクトへの参照を持つLogClassのレコードを、CurTaskClassから作成するようにプログラミングしました。
今回はこのLogClassからクエリでレコードを抽出し、経過時間を集計する処理を作成してみます。
対象読者
MBaaSと連携するAndroidアプリを開発したい方。JavaとEclipseについては解説しませんので、JavaとEclipseの基本的な知識があると読みやすいでしょう。
必要な環境
- JDK
- Eclipse
- Android SDK
- ニフティクラウド Mobile backend Basic(無料版)
どんなクエリを作るのか
まず、LogClassのレコードを抽出して集計します。どんな集計のパターンが考えられるでしょうか。
| フィールド名 | データ型 | 内容 | User/System |
|---|---|---|---|
| objectId | 文字列 | ID | System |
| UserName | 文字列 | getCurrentUser()の戻り値 | User |
| task | 参照 | taskClassオブジェクトへの参照 | User |
| startTime | 日付 | 開始日時 | User |
| endTime | 日付 | 終了日時 | User |
| elapsedTime | 数値 | 経過時間(分単位) | User |
| createDate | 日付 | 作成日時 | System |
| updateDate | 日付 | 更新日時 | System |
まず、担当者は自分がどのタスクにどれだけ時間を掛けたかを知りたいので、UserNameで抽出することが必要になります。逆に管理者はUserNameを指定しないで、全体でどのタスクにどれだけ時間が掛かったかを集計します。
次に期間です。累計の時間が知りたい場合は、日付の範囲を指定する必要はありませんが、今月はどのタスクにどれだけ時間が掛かったか、今週はどんな感じかなどを知りたいときは、日付の範囲で抽出できるようにします。
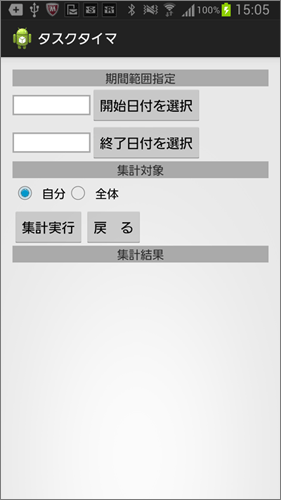
これらのパターンをまとめると集計処理の画面は次のようになります。

集計画面のレイアウトファイルであるactivity_sum.xmlと一緒にみていきましょう。なお、本稿のサンプルコードは記事に添付していますので、ダウンロードし、併せてご覧ください。
<?xml version="1.0" encoding="utf-8"?>
<LinearLayout xmlns:android="http://schemas.android.com/apk/res/android"
    xmlns:tools="http://schemas.android.com/tools"
    android:id="@+id/LinearLayout1"
    android:layout_width="match_parent"
    android:layout_height="match_parent"
    android:orientation="vertical"
    android:paddingBottom="@dimen/activity_vertical_margin"
    android:paddingLeft="@dimen/activity_horizontal_margin"
    android:paddingRight="@dimen/activity_horizontal_margin"
    android:paddingTop="@dimen/activity_vertical_margin"
    tools:context=".SumActivity" >

    <TextView
        android:layout_width="match_parent"
        android:layout_height="wrap_content"
        android:background="#aaaaaa"
        android:text="@string/fromTo"(1)
        android:gravity="center"
        android:textSize="16sp"
        />
一番外側には、LinearLayoutがあります。一番上に表示されるTextViewは背景色をグレイ(#aaaaaa)にして、期間範囲指定とテキスト表示しています。これまで、見た目のわかりやすさや手軽さのため、textやhintプロパティに直接テキスト文字列を記述していましたが、res/values/strings.xmlに登録する方法が推奨されています。また、国際化対応をする場合、strings.xmlに登録する必要がありますので、今回はstrings.xmlに表示する文字列を記述しています(1)。
<?xml version="1.0" encoding="utf-8"?>
<resources>
    <string name="app_name">タスクタイマ</string>
    <string name="action_settings">Settings</string>
    <string name="app_key">ここにアプリケーションキーを記述する</string>
    <string name="client_key">ここにクライアントキーを記述する</string>
    <string name="menu">メニュー</string>
    <string name="addTask">新規タスク</string>
    <string name="sum">集計</string>
    <string name="logout">Logout</string>
    <string name="fromTo">期間範囲指定</string>
    <string name="btnFrom">開始日付を選択</string>
    <string name="btnTo">終了日付を選択</string>
    <string name="sumWho">集計対象</string>
    <string name="meOnly">自分</string>
    <string name="allMember">全体</string>
    <string name="sumStart">集計実行</string>
    <string name="cancel">戻 る</string>
    <string name="sumResult">集計結果</string>
</resources>
次に、orientationプロパティにhorizontalを指定したLinearLayoutを配置して、その中にTextViewとButtonを置きます。
<LinearLayout
    android:orientation="horizontal"
    android:layout_width="match_parent"
    android:layout_height="wrap_content">

    <TextView
        android:id="@+id/textViewFrom"
        android:layout_width="100dp"
        android:layout_height="26dp"
        android:textSize="16sp"
        android:background="@drawable/frame"(2)
        android:padding ="3dp"(3)
        />
    <Button
        android:id="@+id/buttonFrom"
        android:layout_width="wrap_content"
        android:layout_height="wrap_content"
        android:text="@string/btnFrom"
        />
</LinearLayout>
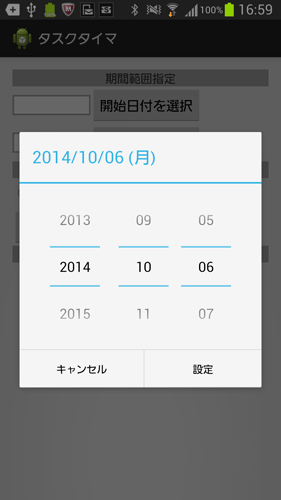
このTextViewには指定された開始日付を表示します。また、その右にあるButtonは「開始日付を選択」と表示しているように、タップされたら、datePickerDialogを表示します。

datePickerDialogでは、年、月、日を縦スクロールして選択することができます。設定ボタンをタップすると、左のTextViewに選択された日付を文字列として表示するわけですが、そのTextViewのプロパティにも注目してください。
backgroundプロパティに指定している@drawable/frameは、resディレクトリ以下にdrawableディレクトリを作成し、そこにframe.xmlという名前で作成したファイルを指します(2)。
<?xml version="1.0" encoding="utf-8"?>
<shape xmlns:android="http://schemas.android.com/apk/res/android"
    android:shape="rectangle">
    <solid android:color="#FFFFFF"/>
    <stroke android:width="2dp" android:color="#aaaaaa" />
</shape>
frame.xmlでは、shapeタグでrectangle(長方形)を描画します。その長方形にはstrokeで、2dpのグレイの枠線を描いています。このようにしないと、TextViewがどこにあるのかわかりにくいからです。もう一つ、注意したいのはpaddingプロパティです(3)。3dp内側にスペースをとるように指定しています。このようにpaddingで空白をあけないと、枠線と表示する文字列が重なってしまいます。
TextViewではなく、EditTextを使えば枠線を描画してくれるのですが、ここでは日付の書式をyyyy-mm-ddに簡単に固定したかったので、直接文字入力できないようにTextViewを使いました。yyyy-mm-dd形式にしたかった理由は後ほど説明します。
次のLinearLayoutの中は終了日付です。TextViewのプロパティなどは開始日付と同じです。ボタンを押すと、同様にdatePickerDialogを開きます。
<LinearLayout
    android:orientation="horizontal"
    android:layout_width="match_parent"
    android:layout_height="wrap_content">

    <TextView
        android:id="@+id/textViewTo"
        android:layout_width="100dp"
        android:layout_height="26dp"
        android:textSize="16sp"
        android:background="@drawable/frame"
        android:padding ="3dp"
        />
    <Button
        android:id="@+id/buttonTo"
        android:layout_width="wrap_content"
        android:layout_height="wrap_content"
        android:text="@string/btnTo"
        />
</LinearLayout>
集計対象と表示しているTextViewの下にRadioGroupがあります(4)。
<RadioGroup (4)
   android:id="@+id/rgSum"
   android:orientation="horizontal"
   android:layout_width="match_parent"
   android:layout_height="wrap_content" >
    <RadioButton
        android:id="@+id/rbMeOnly"
        android:layout_width="wrap_content"
        android:layout_height="wrap_content"
        android:checked="true"
        android:text="@string/meOnly" />
    <RadioButton
        android:id="@+id/rbAll"
        android:layout_width="wrap_content"
        android:layout_height="wrap_content"
        android:text="@string/allMember" />
</RadioGroup>
RadioGroupはRadioButtonをグループ化します。つまり、RadioGroup内に複数のRadioButtonを配置した場合、オンにできるRadioButtonは一つだけになります。このRadioButtonで自分だけのLogClassのレコードを集計するか全体を集計するかを選択したら、ユーザーは集計実行ボタンを押します。戻るボタンを押した場合は、このアクティビティを呼び出したMainActivityに戻ります。
集計結果は一番下にあるListViewに表示します(5)。
<ListView android:id="@+id/listView1"(5)
    android:layout_width="match_parent"
    android:layout_height="wrap_content"
    />


