はじめに
Windows Presentation Foundation (以下、WPF)はWindowsアプリケーションに豊かな表現力を付与する技術というだけではなく、画面デザイン部分とロジック部分を分けて記述できる技術という側面もあります。そのため、WPF標準コンポーネントで作成した画面を市販コンポーネントに置き換えるようなことも、今までのWindowsフォームよりも行いやすくなっています。
そこで、WPF標準コントロールをFlexGrid for WPFとInputMan for WPFに置き換えたXAML定義に変更し、どのような機能がどれくらい簡単に実装できるのか、確認してみたいと思います。
WPF標準コントロールサンプル
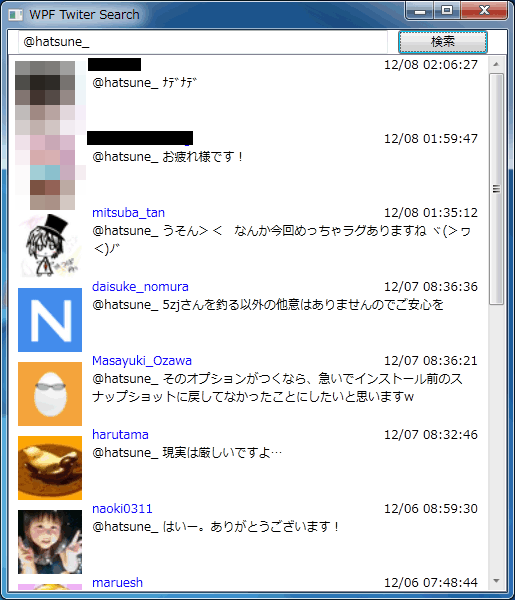
今回は、WPF標準コントロールのTextBoxとListBoxを活用し、Twitterから特定のキーワードの発言を検索して一覧表示するサンプルプログラムを作成しました。ListBoxのデザインはDataTemplateを活用しています。
画面デザインの記述
この画面デザインのXAML定義は次のようになります。
<Window x:Class="MainWindow"
    xmlns="http://schemas.microsoft.com/winfx/2006/xaml/presentation"
    xmlns:x="http://schemas.microsoft.com/winfx/2006/xaml"
    xmlns:c="clr-namespace:WpfTwitterSearch.Converters"
    Title="WPF Twiter Search" Height="600" Width="515">

    <Window.Resources>
        <c:DateConverter x:Key="DateConverter" />
        <DataTemplate x:Key="ItemTemplate">
            <StackPanel Orientation="Horizontal" Margin="6,0" Width="460" >
                <Image Source="{Binding profile_image_url}" HorizontalAlignment="Left" Height="64" Width="64" Margin="0,10,10,0" VerticalAlignment="Top" />
                <StackPanel Orientation="Vertical" Width="386">
                    <Grid>
                        <Grid.ColumnDefinitions>
                            <ColumnDefinition Width="*" />
                            <ColumnDefinition Width="Auto" />
                        </Grid.ColumnDefinitions>
                        <TextBlock Text="{Binding created_at, Converter={StaticResource DateConverter}}" TextWrapping="Wrap" Grid.Column="1" TextAlignment="Right" />
                        <TextBlock Text="{Binding from_user}" TextWrapping="Wrap"  Grid.Column="0" Grid.ColumnSpan="2">
                            <TextBlock.Foreground>
                                <SolidColorBrush Color="Blue"/>
                            </TextBlock.Foreground>
                        </TextBlock>
                    </Grid>
                    <TextBlock Text="{Binding text}" TextWrapping="Wrap" />
                </StackPanel>
            </StackPanel>
        </DataTemplate>
    </Window.Resources>

    <Grid>
        <Grid.RowDefinitions>
            <RowDefinition Height="Auto" />
            <RowDefinition Height="*" />
        </Grid.RowDefinitions>
        <StackPanel x:Name="ContentPanel" Grid.Row="0" Orientation="Horizontal">
            <TextBox x:Name="Keyword_TextBox" Width="370" Margin="10,0,10,0" />
            <Button Content="検索" Click="Search_Click" Width="90" />
        </StackPanel>
        <ListBox x:Name="Result_ListBox" Grid.Row="1" ItemTemplate="{StaticResource ItemTemplate}" />
    </Grid>
</Window>
デザインの要は<DataTemplate>から</DataTemplate>までのテンプレート領域になります。残念ながらこのテンプレートのデザインは、Visual StudioのXAMLエディタでは設計時にデザイン画面に表示されません。テンプレートのデザインをGUIで行いたい場合は、Expression Blendを使うと良いでしょう。
今回のサンプルでは、WPFを使う上で必要なノウハウをもう1つ入れてあります。それがコンバータです。
「xmlns:c="clr-namespace:WpfTwitterSearch.Converters"」でConvertersネームスペースを取り込み「<c:DateConverter x:Key="DateConverter" />」でクラスを指定して「Text="{Binding created_at, Converter={StaticResource DateConverter}}"」とバインディングしています。これで、created_atの内容をそのまま表示するのではなく、DataConverterクラスの「Convert」メソッドを呼び出した結果を表示できます。
Implements IValueConverter
Public Function Convert(ByVal value As Object,
                        ByVal targetType As Type,
                        ByVal parameter As Object,
                        ByVal culture As System.Globalization.CultureInfo) As _
                    Object Implements IValueConverter.Convert
    Try
        Dim dateValue As String = DateTime.ParseExact(value,
                                                      "ddd, dd MMM yyyy HH:mm:ss +0000",
                                                      culture.DateTimeFormat). _
                                                  AddHours(9).ToString("MM/dd hh:mm:ss")
        Return dateValue
    Catch
        Return String.Empty
    End Try
End Function
ロジックの記述
画面デザインができあがったら、ロジックを記述します。Twitterから特定のキーワードで発言を検索する機能を利用するには、search.twitter.comへurlパラメタとしてキーワードを設定し、呼び出しを行います。
URLを呼び出す方法としては同期呼び出しと非同期呼び出しがあります。今回は非同期呼び出しを使うため、System.Net.WebClient型の変数をWithEvent付で宣言し、呼び出し完了イベントが発生するようにします。
Private Const url As String = "http://search.twitter.com/search.json?q={0}"
Friend WithEvents WebClient As New System.Net.WebClient
続いて、画面上の[検索]ボタンがクリックされた時に呼び出されるイベントプロシージャを記述します。この中では「WebClient.DownloadStringAsync(New Uri(uriString))」を使って非同期呼び出しを行っています(ここを「WebClient.DownloadString(New Uri(uriString))」とすれば同期呼び出しになります)。
Private Sub Search_Click(sender As System.Object, e As System.Windows.RoutedEventArgs)
    If Me.Keyword_TextBox.Text.Trim.Length > 0 Then
        Dim uriString As String = String.Format(url,
                                                Uri.EscapeUriString(Me.Keyword_TextBox.Text.Trim))
        WebClient.DownloadStringAsync(New Uri(uriString))
    End If
End Sub
最後に、指定したURLからのレスポンスを非同期受信した時の動作を記述します。今回の戻り値はJSON形式になっているので「DataContractJsonSerializer」を使ってJSON形式に合わせて定義したList(Of T)クラスに格納しています。なおDataContractJsonSerializerを使うためにはあらかじめ「System.Runtime.Serialization」を参照設定しておく必要があります。
データが格納されたList(Of T)クラスをMe.Result_ListBox.ItemSourceに設定すれば、テンプレートデザインにもとづき一覧が表示されます。
Private Sub WebClient_DownloadStringCompleted(sender As Object,
                                              e As System.Net.DownloadStringCompletedEventArgs) _
                                          Handles WebClient.DownloadStringCompleted
    Try
        If e.Error Is Nothing AndAlso e.Cancelled = False Then
            Using stream As New System.IO.MemoryStream(Text.Encoding.UTF8.GetBytes(e.Result))
                Dim serializer As New System.Runtime.Serialization.Json.DataContractJsonSerializer(GetType(TSearchResult))
                Dim jsonDataValue As TSearchResult = CType(serializer.ReadObject(stream), TSearchResult)
                Me.Result_ListBox.ItemsSource = jsonDataValue.results
                Me.Result_ListBox.UpdateLayout()
            End Using
        ElseIf e.Error IsNot Nothing Then
            MessageBox.Show(e.Error.Message)
        End If
    Catch ex As Exception
        MessageBox.Show(ex.Message)
    End Try
End Sub

Public Class TSearch
    Public Property from_user As String
    Public Property text As String
    Public Property created_at As String
    Public Property created_at_local As DateTime
    Public Property profile_image_url As String
    Public Property own_twit As System.Windows.Visibility
End Class

Public Class TSearchResult
    Public Property results As List(Of TSearch)
End Class
コンポーネントサンプル
それでは、TextBoxとListBoxを、InputManとFlexGridに置き換えたサンプルを作ってみましょう。
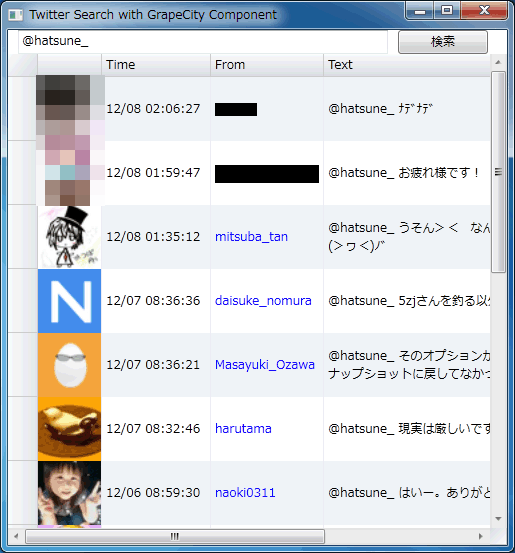
InputManのGcTextBoxとFlexGridのC1FlexGridを利用するにはツールボックスでアイテムの追加を行います。
ツールボックスの[GcTextBox]と[C1FlexGrid]をMainWindows.xamlのデザイン画面にドラッグ&ドロップして配置します。一度配置してしまえば、後はXAMLコードを編集して微調整もできます。
画面デザインの記述
WPF標準コントロールを置き換えた後のXAML定義を見てみましょう。
<Window x:Class="MainWindow"
    xmlns="http://schemas.microsoft.com/winfx/2006/xaml/presentation"
    xmlns:x="http://schemas.microsoft.com/winfx/2006/xaml"
    xmlns:c="clr-namespace:GCTwitterSearch.Converters"
    Title="Twitter Search with GrapeCity Component" Height="600" Width="515" xmlns:im="http://schemas.grapecity.com/windows/2010/inputman" xmlns:c1="http://schemas.componentone.com/winfx/2006/xaml" DataContext="{Binding}" ContentTemplate="{Binding}">

    <Window.Resources>
        <c:DateConverter x:Key="DateConverter" />
    </Window.Resources>

    <Grid>
        <Grid.RowDefinitions>
            <RowDefinition Height="Auto" />
            <RowDefinition Height="*" />
        </Grid.RowDefinitions>
        <StackPanel x:Name="ContentPanel" Grid.Row="0" Orientation="Horizontal">
            <im:GcTextBox x:Name="Keyword_TextBox" Width="370" Margin="10,0,10,0" WatermarkDisplayNull="検索キーワードを入力して下さい" WatermarkNull="検索キーワードを入力して下さい" WatermarkDisplayNullForeground="#7FFF0000" WatermarkNullForeground="#7F000000" />
            <Button Content="検索" Click="Search_Click" Width="90" />
        </StackPanel>
        <c1:C1FlexGrid x:Name="Result_ListBox" Grid.Row="1" IsReadOnly="True" AutoGenerateColumns="False">
            <c1:C1FlexGrid.Columns>
                <c1:Column Width="64">
                    <c1:Column.CellTemplate>
                        <DataTemplate>
                            <Image Source="{Binding profile_image_url}" HorizontalAlignment="Left"
                                   Height="64" Width="64"
                                   VerticalAlignment="Top" />
                        </DataTemplate>
                    </c1:Column.CellTemplate>
                </c1:Column>
                <c1:Column Binding="{Binding created_at, Converter={StaticResource DateConverter}}" Header="Time"  Width="Auto"/>
                <c1:Column Binding="{Binding from_user}" Header="From" Foreground="Blue" />
                <c1:Column Binding="{Binding text}" Header="Text" Width="386" TextWrapping="True" />
            </c1:C1FlexGrid.Columns>
        </c1:C1FlexGrid>
    </Grid>
</Window>
GcTextBoxでは「WatermarkDisplayNull」プロパティで値が未入力の時に表示する文字列、「WatermarkNull」プロパティで値が未入力で入力フォーカスがある時に表示する文字列を指定できます。さらに「WatermarkDisplayNullForeground」プロパティと「WatermarkNullForeground」プロパティを使ってそれぞれの状態のウォータマークの文字色も指定できるので、より的確なイメージを利用者に提供できます。
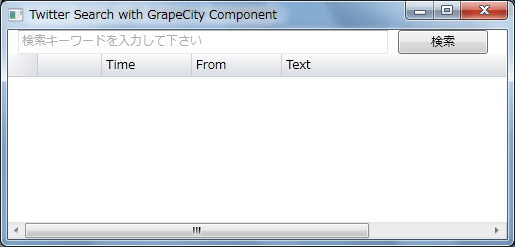
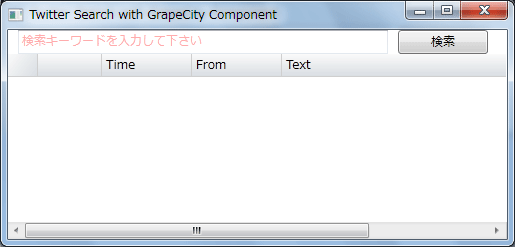
また、C1FlexGridではテンプレートを使わずプロパティとしてデザインを記述しています。そのためデザイン画面でもXAMLで定義したデザインが確認可能です。
Converterも「Binding="{Binding created_at, Converter={StaticResource DateConverter}}"」のようにバインディングの中に記述すれば問題なく利用できます。
ロジックの記述
このサンプルのコードは、WPF標準コントロールを使った時とほぼ同一です。相違点は行の高さを自動設定するメソッドの呼び出しを追加している点です。
(中略)
    Me.Result_ListBox.ItemsSource = jsonDataValue.results
    Me.Result_ListBox.UpdateLayout()
    Me.Result_ListBox.AutoSizeRows(0, Me.Result_ListBox.Rows.Count - 1, 0)
End Using
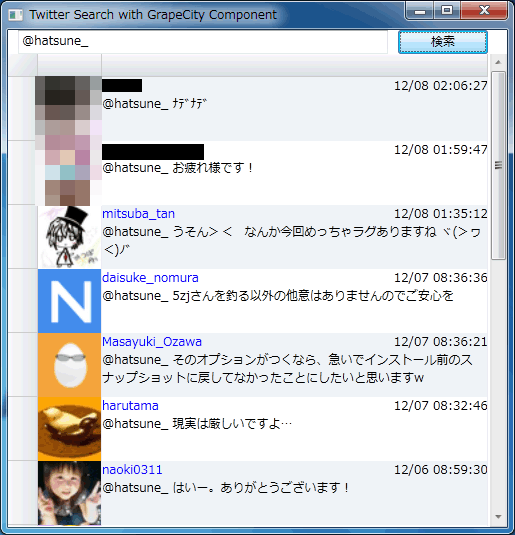
また、ロジックは全く追加していませんが、タイトルをクリックすることによりソート機能も実装しています。この機能はFlexGridによる機能拡張部分となります。このような拡張機能により、下図のように行の背景色(水色/白)を1行ごとに変更することなどもでき、より見やすく表示することが可能です。
複数行表示サンプル(CZ1112TwitterSearch)
FlexGridは、1レコードを1行に表示するコントロールです。FlexGridを使うことでソート機能、グループ化機能、編集機能などが手軽に拡張できます。
では、WPF標準コントロールで実現したような「画像の右側に2行構成で1レコードを表示」するデザインは作成できるのでしょうか。これも、XAMLの知識が少しだけあればFlexGridで同じようなデザインを実現できます。サンプルのXAML定義を変更し、次のような画面を実現してみましょう(サンプルコード内の「CZ1112TwitterSearch」を使用します)。
画面デザインの記述
FlexGridの書き換え部分を見てみましょう。
<c1:C1FlexGrid x:Name="Result_ListBox" Grid.Row="1" IsReadOnly="True" AutoGenerateColumns="False">
    <c1:C1FlexGrid.Columns>
        <c1:Column Width="64">
            <c1:Column.CellTemplate>
                <DataTemplate>
                    <Image Source="{Binding profile_image_url}" HorizontalAlignment="Left"
                            Height="64" Width="64"
                            VerticalAlignment="Top" />
                </DataTemplate>
            </c1:Column.CellTemplate>
        </c1:Column>
        <c1:Column  Width="386">
            <c1:Column.CellTemplate>
                <DataTemplate>
                    <StackPanel Orientation="Vertical" Width="386">
                        <Grid>
                            <Grid.ColumnDefinitions>
                                <ColumnDefinition Width="*" />
                                <ColumnDefinition Width="Auto" />
                            </Grid.ColumnDefinitions>
                            <TextBlock Text="{Binding from_user}" TextWrapping="Wrap"  Grid.Column="0">
                                <TextBlock.Foreground>
                                    <SolidColorBrush Color="Blue"/>
                                </TextBlock.Foreground>
                            </TextBlock>
                            <TextBlock Text="{Binding created_at, Converter={StaticResource DateConverter}}" TextWrapping="Wrap" Grid.Column="1" TextAlignment="Right" />
                        </Grid>
                        <TextBlock Text="{Binding text}" TextWrapping="Wrap" />
                    </StackPanel>
                </DataTemplate>
            </c1:Column.CellTemplate>
        </c1:Column>
    </c1:C1FlexGrid.Columns>
</c1:C1FlexGrid>
このXAMLの特徴は「c1:Column.CellTemplate」を使ってセルテンプレートを定義する点です。セルの中でDataTemplateを使ってデザインを定義しています。これにより、ListBoxの部分を移植する際、見た目の再現性も高くなります。
ロジックの記述
今回もコードの変更はありません。
まとめ
本記事により、WPF標準コントロールから市販コンポーネントへの置き換えについてはどのような印象を受けられたでしょうか。一言でいえば「簡単」と感じてもらえたかと思います。
コンポーネントを使用するという提案をした場合、「コンポーネントを使わないと作れないものなの?」と問われることがあります。WPFではさらに「それって工夫すればXAMLで作れないの?」と問われる場合も多いでしょう。
しかし、市販コンポーネントを使用するということは「工夫して作らなくて良い」ということであり、作れる・作れないではなく、費用対効果や品質という視点で判断する必要があるでしょう。コンポーネント部分の作成費用だけではなく、コンポーネントを使うことで効率的に品質よくアプリを作成できるという面も考慮しなければなりません。
WPF標準コントロールからの置き換えも簡単で、WPF標準コントロールには無い機能を付与できる「InputMan for WPF」や「FlexGrid for WPF」は、WPF開発になくてはならないコンポーネントであると言えるでしょう。


