LEADTOOLSは高速な多機能画像処理コンポーネントですが、それゆえに画像ファイルに対する処理にのみ適用するようなイメージがあります。しかし、Kinectからのデータは連続した画像データとして取得できます。つまり、動画のように見えていても、処理単位は画像データとなるため、LEADTOOLSが適用できるのではないかと考えました。
結論から言えば、非常に良い結果を得ることができました。
Kinect距離データを画面に表示する
(※サンプルファイルの「CZ1312HistogramVB」に対応)
Kinectからの距離データを、WPFのImageコントロールに表示するサンプルを作成します。

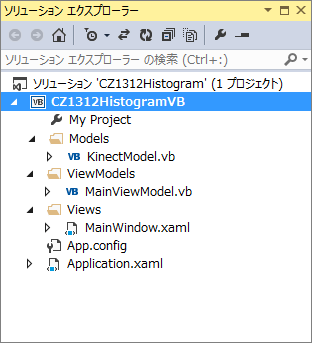
KinectModel.vb
KinectModelクラスには、Kinectからの距離データをImageSourceとして公開する処理を記述します。
重要な部分を抜粋すると次のようになります。
        :
    (略)
        :
Private WithEvents Kinect As KinectSensor

Private _DepthImageElement As ImageSource
Public Property DepthImageElement As ImageSource
    Get
        Return Me._DepthImageElement
    End Get
    Set(value As ImageSource)
        Me._DepthImageElement = value
        OnPropertyChanged()
    End Set
End Property
        :
    (略)
        :
Private Sub DiscoverKinectSensor()
    Me.Kinect = KinectSensor.KinectSensors.FirstOrDefault(
        Function(x)
            Return x.Status = KinectStatus.Connected
        End Function)
    If Me.Kinect IsNot Nothing Then
        Me.Kinect.DepthStream.Enable()
        Me.Kinect.Start()
        Me.DepthImageBitmap = New WriteableBitmap(DepthDesc.Width,
                                                  DepthDesc.Height,
                                                  96.0,
                                                  96.0,
                                                  PixelFormats.Gray16,
                                                  Nothing)
        ReDim Me.DepthImageFrameData(depthDesc.Width * depthDesc.Height - 1)
        Me.DepthImageBitmapRect = New Int32Rect(0,
                                                0,
                                                DepthDesc.Width,
                                                DepthDesc.Height)
        Me.DepthImageStride = DepthDesc.Width * Me.BytesPerPixel
    End If
End Sub

Private Sub Kinect_DepthFrameReady(sender As Object,
                                   e As DepthImageFrameReadyEventArgs) _
                               Handles Kinect.DepthFrameReady
    Using frame = e.OpenDepthImageFrame
        If frame IsNot Nothing Then
            frame.CopyPixelDataTo(Me.DepthImageFrameData)

            Me.DepthImageBitmap.WritePixels(Me.DepthImageBitmapRect,
                                            Me.DepthImageFrameData,
                                            Me.DepthImageStride,
                                            0)
            Me.DepthImageElement = Me.DepthImageBitmap
        End If
    End Using
End Sub
重要なポイントは、距離データがセンサーから送られてくるとイベント呼び出しされるKinect_DepthFrameReadyイベントプロシージャで、この中で次の処理を実施しています。
- OpenDepthImageFrameメソッドでフレーム形式の距離データを取得
- CopyPixelDataToメソッドで2バイト配列に格納
- WritePixelsメソッドで2バイト配列をグレースケールのWritebleBitmapに設定
- WritebleBitmapをImageSourceとして公開
MainViewModel.vb
MainViewModelクラスでは、KinectModelが公開しているDepthImageElementプロパティとPropertyChangedイベントを公開しています。
MainWindow.xaml
<Window
    x:Class="MainWindow"
    Title="CZ1312HistogramVB"
    Height="300" Width="640"
    xmlns="http://schemas.microsoft.com/winfx/2006/xaml/presentation"
    xmlns:x="http://schemas.microsoft.com/winfx/2006/xaml"
    xmlns:d="http://schemas.microsoft.com/expression/blend/2008"
    xmlns:local="clr-namespace:CZ1312HistogramVB"
    Loaded="WIndow_Loaded" Closing="Window_Closing">
    <Viewbox>
        <Grid>
            <Grid.ColumnDefinitions>
                <ColumnDefinition Width="1*" />
                <ColumnDefinition Width="1*" />
            </Grid.ColumnDefinitions>
            <Image Grid.Column="0" Grid.Row="0"
                        Source="{Binding DepthImageElement}"  Width="640" Height="480" />
            <Image Grid.Column="1" Grid.Row="0"
                        Source="{Binding DepthImageElement}"  Width="640" Height="480" />
        </Grid>
    </Viewbox>
</Window>
WPFの画面定義体であるXAMLで画面を左右に2分割し、同じデータを表示するようにします。あとで一方をLEADTOOLSで見やすくします。
MainWindow.xaml.vb
Class MainWindow
    Private ViewModel As New MainViewModel

    Public Sub New()
        InitializeComponent()
        Me.DataContext = Me.ViewModel
    End Sub

    Private Sub WIndow_Loaded(sender As Object, e As RoutedEventArgs)
        Me.ViewModel.StartCommand()
    End Sub

    Private Sub Window_Closing(sender As Object, e As ComponentModel.CancelEventArgs)
        Me.ViewModel.StopCommand()
    End Sub
End Class
データの表示などはXAMLのBindingを使うので、コードビハインド側ではDataContextの設定と、Kinectセンサーの開始と停止のメソッド起動の記述だけで済みます。
実行結果
距離に応じて手前が濃く、奥が薄いグレースケールで表示できていると思います。いろいろ動いてその変化を確認してみましょう。


