


データをSPREADに表示する(2)
ビューモデルを作成
次に、ビューモデルに該当するクラスをProductViewModelという名称で、新規に作成します。ビューモデルクラスは値が変更された場合に、ビューに変更を通知するため、INotifyPropertyChangedインタフェースを実装します。まずは、データをSPREADに表示するだけですので、モデルからデータを取得します。ビューモデルにプロパティとして定義されるデータコレクションにデータが取得されると、ビューに通知が行くという仕組みです。
Imports System.Collections.ObjectModel
Imports System.ComponentModel

Public Class ProductViewModel
    Implements INotifyPropertyChanged

    Private _products As ObservableCollection(Of Product)
    Private _model As ProductModel

    Public Sub New()
        ' モデルからデータを取得します。
        _model = New ProductModel()
        _products = _model.GetProducts()
    End Sub

    ' データのコレクション
    Public Property Products As ObservableCollection(Of Product)
        Get
            Return _products
        End Get
        Set(value As ObservableCollection(Of Product))
            If _products.Equals(value) Then
                _products = value
                ' ビューに値の変更を通知します。
                OnPropertyChanged("Products")
            End If
        End Set
    End Property

    Public Event PropertyChanged As PropertyChangedEventHandler Implements INotifyPropertyChanged.PropertyChanged

    ' 値が変更されるとビューに変更を通知します。
    Protected Overridable Sub OnPropertyChanged(propname As String)
        RaiseEvent PropertyChanged(Me, New PropertyChangedEventArgs(propname))
    End Sub
End Class
// 次の名前空間宣言を追加しています。
// using System.Collections.ObjectModel;
// using System.ComponentModel;

public class ProductViewModel : INotifyPropertyChanged
{
    private ObservableCollection<Product> _products;
    private ProductModel _model;

    public ProductViewModel()
    {
        // モデルからデータを取得します。
        _model = new ProductModel();
        _products = _model.GetProducts();
    }

    // データのコレクション
    public ObservableCollection<Product> Products
    {
        get { return _products; }
        set
        {
            if (_products != value)
            {
                _products = value;
                // Viewに値の変更を通知します。
                OnPropertyChanged("Products");
            }
        }
    }

    public event PropertyChangedEventHandler PropertyChanged;

    // 値が変更されるとビューに変更を通知します。
    protected virtual void OnPropertyChanged(string propName)
    {
        if (PropertyChanged != null)
        {
            PropertyChanged(this, new PropertyChangedEventArgs(propName));
        }
    }
}
ビューを作成
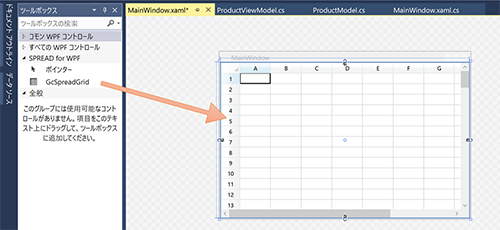
最後にビューに該当するUIを作成します。データを表示するUIには、SPREAD for WPFを使用します。MainWindow.xamlをVisual Studioのデザイン画面で開き、ツールボックスからSPREAD(gcSpreadGrid1)を配置します。
WindowのDataContextプロパティにビューモデルを設定し、GcSpreadGridクラスのItemSourceプロパティに、ProductViewModelクラスで定義したデータコレクションにバインドします。
備考
XAMLコードでは、次のような名前空間を宣言しています。
xmlns:local="clr-namespace:SpreadWPF_MVVM"
<Window.DataContext>
    <local:ProductViewModel/>
</Window.DataContext>
<StackPanel>
    <sg:GcSpreadGrid x:Name="gcSpreadGrid1" ItemsSource="{Binding Products}" >
    </sg:GcSpreadGrid>
</StackPanel>
コードビハインドでも実装できます。
Class MainWindow
    Sub New()
        ' この呼び出しはデザイナーで必要です。
        InitializeComponent()

        Dim viewModel As New ProductViewModel()
        Me.DataContext = viewModel

        ' SPREADとビューモデルのデータコレクションをバインドします。
        Dim binding1 As New Binding("Products")
        GcSpreadGrid1.SetBinding(GcSpreadGrid.ItemsSourceProperty, binding1)
    End Sub
End Class
public MainWindow()
{
    InitializeComponent();

    ProductViewModel viewModel = new ProductViewModel();
    this.DataContext = viewModel;

    // SPREADとビューモデルのデータコレクションをバインドします。
    Binding binding1 = new Binding("Products");
    gcSpreadGrid1.SetBinding(GcSpreadGrid.ItemsSourceProperty, binding1);
}
ビューでの設定は以上です。モデルで定義されたデータがビューモデルを介してビューに表示されるようになります。上記のコードを実行すると次のような画面となります。
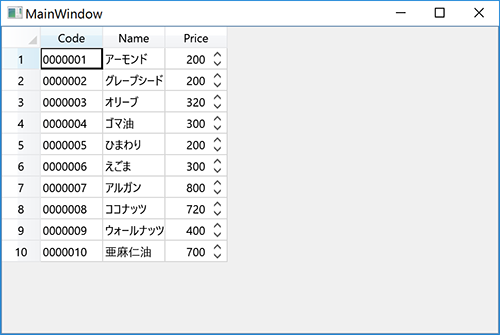
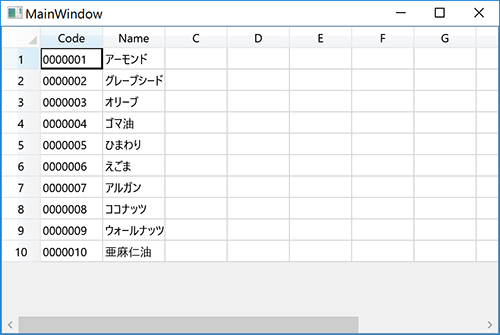
SPREADには連結するデータのデータフィールドを自動的に列として生成する機能があります。既定では列の自動生成が有効になっているため、上記のように連結したデータはすべてSPREADに表示されます。特定のデータ列のみ表示したい場合は、列の自動生成機能を無効にし、列のDataFieldプロパティを使用してデータソースのフィールドに関連付けます。列の自動生成機能は、GcSpreadGridクラスのAutoGenerateColumnsプロパティをfalseに設定すると無効となります。次のコードでは、「Price」列のみ非表示にします。
<Window.DataContext>
    <local:ProductViewModel/>
</Window.DataContext>
<StackPanel>
    <sg:GcSpreadGrid x:Name="gcSpreadGrid1" ItemsSource="{Binding Products}" AutoGenerateColumns="False">
        <sg:GcSpreadGrid.Columns>
            <sg:Column>
                <sg:Column.DataField>
                    <sg:PropertyDataField Property="Code" />
                </sg:Column.DataField>
            </sg:Column>
            <sg:Column>
                <sg:Column.DataField>
                    <sg:PropertyDataField Property="Name" />
                </sg:Column.DataField>
            </sg:Column>
        </sg:GcSpreadGrid.Columns>
    </sg:GcSpreadGrid>
</StackPanel>
コードビハインドでの同じ設定は、以下のようなコードで可能です。
‘ 次の名前空間宣言を追加しています。
‘ Imports GrapeCity.Windows.SpreadGrid

Sub New()
    ' この呼び出しはデザイナーで必要です。
    InitializeComponent()

    ' InitializeComponent() 呼び出しの後で初期化を追加します。
    Dim viewModel As New ProductViewModel()
    Me.DataContext = viewModel

    ' 列の自動生成を無効にします。
    GcSpreadGrid1.AutoGenerateColumns = False

    ' Code、Name列のみ表示します。
    GcSpreadGrid1.Columns(0).DataField = New PropertyDataField() With {.Property = "Code"}
    GcSpreadGrid1.Columns(1).DataField = New PropertyDataField() With {.Property = "Name"}

    ' SPREADとビューモデルのデータコレクションをバインドします。
    Dim spreadBinding As New Binding("Products")
    GcSpreadGrid1.SetBinding(GcSpreadGrid.ItemsSourceProperty, spreadBinding)
End Sub
// 次の名前空間宣言を追加しています。
// using GrapeCity.Windows.SpreadGrid;

public MainWindow()
{
    InitializeComponent();

    ProductViewModel viewModel = new ProductViewModel();
    this.DataContext = viewModel;

    // 列の自動生成を無効にします。
    gcSpreadGrid1.AutoGenerateColumns = false;

    // Code、Name列のみ表示します。
    gcSpreadGrid1.Columns[0].DataField = new PropertyDataField() { Property = "Code" };
    gcSpreadGrid1.Columns[1].DataField = new PropertyDataField() { Property = "Name" };

    // SPREADとビューモデルのデータコレクションをバインドします。
    Binding spreadBinding = new Binding("Products");
    gcSpreadGrid1.SetBinding(GcSpreadGrid.ItemsSourceProperty, spreadBinding);

}
備考
ここでは特に表示列数の指定はしていないため、既定の10列が表示されます。

