SPREAD for WPFとは
累計販売ライセンス140,000本を超え、グレープシティを代表する製品の一つ「SPREAD」シリーズのWPF向けコンポーネントです。SPREADの最大の特長であるExcelライクな外観や操作性のほか、1レコード複数行表示やグループ集計など、独自機能も備えます。詳しい機能は、製品情報サイトで紹介しておりますので、是非ご一読ください。また、ClickOnceデモも公開しています。
対象読者
- Visual Basic、C#を使ってプログラムを作ったことのある方
- 業務アプリケーションにグリッドを使用している方
- MVVMを使用したWPFアプリケーション開発に興味のある方
準備
本記事で紹介するサンプルを実行するには、Visual Studio 2010/2012/2013/2015およびSPREAD for WPF 1.0Jの製品版またはトライアル版のインストールが必要です。トライアル版はこちらからダウンロードしていただけます。インストール方法や、Visual Studioのツールボックスにコントロールを追加する方法については、過去記事「いよいよ登場! WPFをブレイクスルーする魅惑のコンポーネント「SPREAD for WPF 1.0J」で詳しく解説されていますので、そちらをご覧ください。
サンプルアプリケーションの概要
コード、製品名、価格というフィールドを持った製品データ一覧をSPREADに表示し、SPREADのボタン型セルを使用してコマンドを実行するという簡単なWPFアプリケーションを、MVVMパターンで作成します。
データをSPREADに表示する(1)
まずは、製品データを単純にSPREADに表示するだけのアプリケーションを作成しましょう。SpreadWPF_MVVMという名前で新規プロジェクトを作成します。
モデルを作成
ここでは、単純にデータをモデル化したものをモデルとして定義します。ProductModelという名称のクラスを作成し、製品(コード、名称、価格)データのコレクションを生成、そのコレクションを返すメソッドを用意します。
Imports System.Collections.ObjectModel

Public Class Product
    Public Property Code As String
    Public Property Name As String
    Public Property Price As Integer
End Class

Public Class ProductModel
    Private _items As ObservableCollection(Of Product)

    Public Sub New()
        _items = New ObservableCollection(Of Product) From
        {
            New Product() With {.Code = "0000001", .Name = "アーモンド", .Price = 200},
            New Product() With {.Code = "0000002", .Name = "グレープシード", .Price = 200},
            New Product() With {.Code = "0000003", .Name = "オリーブ", .Price = 320},
            New Product() With {.Code = "0000004", .Name = "ゴマ油", .Price = 300},
            New Product() With {.Code = "0000005", .Name = "ひまわり", .Price = 200},
            New Product() With {.Code = "0000006", .Name = "えごま", .Price = 300},
            New Product() With {.Code = "0000007", .Name = "アルガン", .Price = 800},
            New Product() With {.Code = "0000008", .Name = "ココナッツ", .Price = 720},
            New Product() With {.Code = "0000009", .Name = "ウォールナッツ", .Price = 400},
            New Product() With {.Code = "0000010", .Name = "亜麻仁油", .Price = 700}
        }
    End Sub

    ' データコレクションを返します。
    Public Function GetProducts() As ObservableCollection(Of Product)
        Return _items
    End Function
End Class
// 次の名前空間宣言を追加しています
// using System.Collections.ObjectModel;

public class Product
{
    public string Code { get; set; }
    public string Name { get; set; }
    public int Price { get; set; }
    public int Number { get; set; }
}

public class ProductModel
{
    private ObservableCollection<Product> _items;
    public ProductModel()
    {
        _items = new ObservableCollection<Product>
        {
            new Product() { Code = "0000001", Name = "アーモンド", Price = 200 },
            new Product() { Code = "0000002", Name = "グレープシード", Price = 200 },
            new Product() { Code = "0000003", Name = "オリーブ", Price = 320 },
            new Product() { Code = "0000004", Name = "ゴマ油", Price = 300 },
            new Product() { Code = "0000005", Name = "ひまわり", Price = 200 },
            new Product() { Code = "0000006", Name = "えごま", Price = 300 },
            new Product() { Code = "0000007", Name = "アルガン", Price = 800 },
            new Product() { Code = "0000008", Name = "ココナッツ", Price = 720 },
            new Product() { Code = "0000009", Name = "ウォールナッツ", Price = 400 },
            new Product() { Code = "0000010", Name = "亜麻仁油", Price = 700 }
        };
    }

    public ObservableCollection<Product> GetProducts()
    {
        return _items;
    }
}
データをSPREADに表示する(2)
ビューモデルを作成
次に、ビューモデルに該当するクラスをProductViewModelという名称で、新規に作成します。ビューモデルクラスは値が変更された場合に、ビューに変更を通知するため、INotifyPropertyChangedインタフェースを実装します。まずは、データをSPREADに表示するだけですので、モデルからデータを取得します。ビューモデルにプロパティとして定義されるデータコレクションにデータが取得されると、ビューに通知が行くという仕組みです。
Imports System.Collections.ObjectModel
Imports System.ComponentModel

Public Class ProductViewModel
    Implements INotifyPropertyChanged

    Private _products As ObservableCollection(Of Product)
    Private _model As ProductModel

    Public Sub New()
        ' モデルからデータを取得します。
        _model = New ProductModel()
        _products = _model.GetProducts()
    End Sub

    ' データのコレクション
    Public Property Products As ObservableCollection(Of Product)
        Get
            Return _products
        End Get
        Set(value As ObservableCollection(Of Product))
            If _products.Equals(value) Then
                _products = value
                ' ビューに値の変更を通知します。
                OnPropertyChanged("Products")
            End If
        End Set
    End Property

    Public Event PropertyChanged As PropertyChangedEventHandler Implements INotifyPropertyChanged.PropertyChanged

    ' 値が変更されるとビューに変更を通知します。
    Protected Overridable Sub OnPropertyChanged(propname As String)
        RaiseEvent PropertyChanged(Me, New PropertyChangedEventArgs(propname))
    End Sub
End Class
// 次の名前空間宣言を追加しています。
// using System.Collections.ObjectModel;
// using System.ComponentModel;

public class ProductViewModel : INotifyPropertyChanged
{
    private ObservableCollection<Product> _products;
    private ProductModel _model;

    public ProductViewModel()
    {
        // モデルからデータを取得します。
        _model = new ProductModel();
        _products = _model.GetProducts();
    }

    // データのコレクション
    public ObservableCollection<Product> Products
    {
        get { return _products; }
        set
        {
            if (_products != value)
            {
                _products = value;
                // Viewに値の変更を通知します。
                OnPropertyChanged("Products");
            }
        }
    }

    public event PropertyChangedEventHandler PropertyChanged;

    // 値が変更されるとビューに変更を通知します。
    protected virtual void OnPropertyChanged(string propName)
    {
        if (PropertyChanged != null)
        {
            PropertyChanged(this, new PropertyChangedEventArgs(propName));
        }
    }
}
ビューを作成
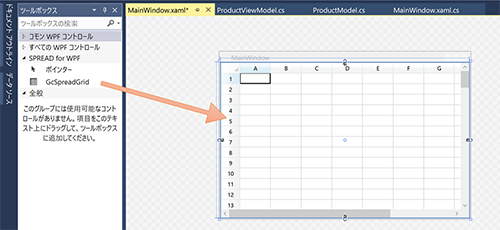
最後にビューに該当するUIを作成します。データを表示するUIには、SPREAD for WPFを使用します。MainWindow.xamlをVisual Studioのデザイン画面で開き、ツールボックスからSPREAD(gcSpreadGrid1)を配置します。
WindowのDataContextプロパティにビューモデルを設定し、GcSpreadGridクラスのItemSourceプロパティに、ProductViewModelクラスで定義したデータコレクションにバインドします。
備考
XAMLコードでは、次のような名前空間を宣言しています。
xmlns:local="clr-namespace:SpreadWPF_MVVM"
<Window.DataContext>
    <local:ProductViewModel/>
</Window.DataContext>
<StackPanel>
    <sg:GcSpreadGrid x:Name="gcSpreadGrid1" ItemsSource="{Binding Products}" >
    </sg:GcSpreadGrid>
</StackPanel>
コードビハインドでも実装できます。
Class MainWindow
    Sub New()
        ' この呼び出しはデザイナーで必要です。
        InitializeComponent()

        Dim viewModel As New ProductViewModel()
        Me.DataContext = viewModel

        ' SPREADとビューモデルのデータコレクションをバインドします。
        Dim binding1 As New Binding("Products")
        GcSpreadGrid1.SetBinding(GcSpreadGrid.ItemsSourceProperty, binding1)
    End Sub
End Class
public MainWindow()
{
    InitializeComponent();

    ProductViewModel viewModel = new ProductViewModel();
    this.DataContext = viewModel;

    // SPREADとビューモデルのデータコレクションをバインドします。
    Binding binding1 = new Binding("Products");
    gcSpreadGrid1.SetBinding(GcSpreadGrid.ItemsSourceProperty, binding1);
}
ビューでの設定は以上です。モデルで定義されたデータがビューモデルを介してビューに表示されるようになります。上記のコードを実行すると次のような画面となります。
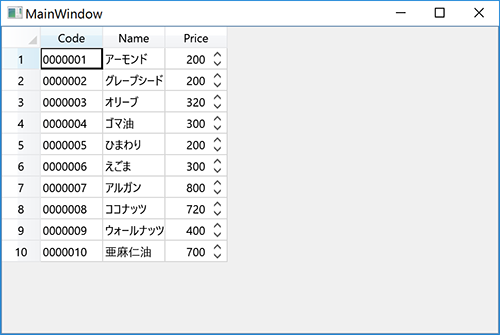
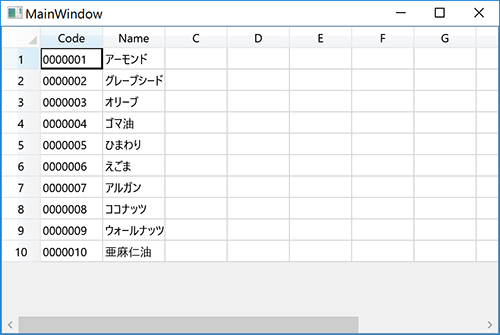
SPREADには連結するデータのデータフィールドを自動的に列として生成する機能があります。既定では列の自動生成が有効になっているため、上記のように連結したデータはすべてSPREADに表示されます。特定のデータ列のみ表示したい場合は、列の自動生成機能を無効にし、列のDataFieldプロパティを使用してデータソースのフィールドに関連付けます。列の自動生成機能は、GcSpreadGridクラスのAutoGenerateColumnsプロパティをfalseに設定すると無効となります。次のコードでは、「Price」列のみ非表示にします。
<Window.DataContext>
    <local:ProductViewModel/>
</Window.DataContext>
<StackPanel>
    <sg:GcSpreadGrid x:Name="gcSpreadGrid1" ItemsSource="{Binding Products}" AutoGenerateColumns="False">
        <sg:GcSpreadGrid.Columns>
            <sg:Column>
                <sg:Column.DataField>
                    <sg:PropertyDataField Property="Code" />
                </sg:Column.DataField>
            </sg:Column>
            <sg:Column>
                <sg:Column.DataField>
                    <sg:PropertyDataField Property="Name" />
                </sg:Column.DataField>
            </sg:Column>
        </sg:GcSpreadGrid.Columns>
    </sg:GcSpreadGrid>
</StackPanel>
コードビハインドでの同じ設定は、以下のようなコードで可能です。
‘ 次の名前空間宣言を追加しています。
‘ Imports GrapeCity.Windows.SpreadGrid

Sub New()
    ' この呼び出しはデザイナーで必要です。
    InitializeComponent()

    ' InitializeComponent() 呼び出しの後で初期化を追加します。
    Dim viewModel As New ProductViewModel()
    Me.DataContext = viewModel

    ' 列の自動生成を無効にします。
    GcSpreadGrid1.AutoGenerateColumns = False

    ' Code、Name列のみ表示します。
    GcSpreadGrid1.Columns(0).DataField = New PropertyDataField() With {.Property = "Code"}
    GcSpreadGrid1.Columns(1).DataField = New PropertyDataField() With {.Property = "Name"}

    ' SPREADとビューモデルのデータコレクションをバインドします。
    Dim spreadBinding As New Binding("Products")
    GcSpreadGrid1.SetBinding(GcSpreadGrid.ItemsSourceProperty, spreadBinding)
End Sub
// 次の名前空間宣言を追加しています。
// using GrapeCity.Windows.SpreadGrid;

public MainWindow()
{
    InitializeComponent();

    ProductViewModel viewModel = new ProductViewModel();
    this.DataContext = viewModel;

    // 列の自動生成を無効にします。
    gcSpreadGrid1.AutoGenerateColumns = false;

    // Code、Name列のみ表示します。
    gcSpreadGrid1.Columns[0].DataField = new PropertyDataField() { Property = "Code" };
    gcSpreadGrid1.Columns[1].DataField = new PropertyDataField() { Property = "Name" };

    // SPREADとビューモデルのデータコレクションをバインドします。
    Binding spreadBinding = new Binding("Products");
    gcSpreadGrid1.SetBinding(GcSpreadGrid.ItemsSourceProperty, spreadBinding);

}
備考
ここでは特に表示列数の指定はしていないため、既定の10列が表示されます。
コマンドを作成する
現時点で、SPREADには「Code」と「Name」のデータだけが表示されていますので、選択された製品の「Price」を取得するというコマンドを作成しましょう。ビュー側でコマンドをバインディングできるのは、基本的にMenuItemやButtonといったICommandインタフェースを実装したコントロールです。SPREADでは、ボタン型セルにコマンド機能を設定することができます。ただし、ボタン型セルのCommandプロパティは、依存関係プロパティではないため、ビューモデルのプロパティとして公開されたコマンドに直接バインドすることはできません。そこで、ボタン型セルに設定するカスタムコマンドのパラメータに、ビューで作成したビューモデルのインスタンスを渡す方法を紹介します。
ビューモデルにプロパティを追加
ProductViewModelクラスにビューとバインディングするデータをプロパティとして追加します。ここでは、選択された製品「SelectedProduct」と、製品名「ProductName」、価格「ProductPrice」の3つのプロパティを追加し、それぞれビューに変更が通知されるよう、OnPropertyChangedメソッドを実装します。
Private Property _productName
Public Property ProductName As String
    Get
        Return _productName
    End Get
    Set(value As String)
        _productName = value
        OnPropertyChanged("ProductName")
    End Set
End Property

Private Property _productPrice
Public Property ProductPrice As Integer
    Get
        Return _productPrice
    End Get
    Set(value As Integer)
        _productPrice = value
        OnPropertyChanged("ProductPrice")
    End Set
End Property

Private Property _selectedProduct
Public Property SelectedProduct As Product
    Get
        Return _selectedProduct
    End Get
    Set(value As Product)
        _selectedProduct = value
        OnPropertyChanged("SelectedProduct")
    End Set
End Property
private string _ProductName;
public string ProductName
{
    get { return _ProductName; }
    set
    {
        _ProductName = value;
        OnPropertyChanged("ProductName");
    }
}

private int _ProductPrice;
public int ProductPrice
{
    get { return _ProductPrice; }
    set
    {
        _ProductPrice = value;
        OnPropertyChanged("ProductPrice");
    }
}

private Product _SelectedProduct;
public Product SelectedProduct
{
    get { return _SelectedProduct; }
    set
    {
        _SelectedProduct = value;
        OnPropertyChanged("SelectedProduct");
    }
}
コマンドを実装
次に、選択された製品から、製品名と価格を取得するコマンドを実装します。コマンドはICommandインタフェースを実装します。ボタン型セルにコマンドを設定すると、Executeメソッドのパラメータからは、セルの情報を保存したCellCommandParameterオブジェクトを取得できます。CellCommandParameterクラスのCustomCommandParameterプロパティには、任意の情報を保存できます。ここでは、ProductViewModelオブジェクトを保存し、ビューモデルクラスのメンバにアクセスできるようにします。
‘ 次の名前空間宣言を追加しています。
‘ Imports GrapeCity.Windows.SpreadGrid

Public Class GetPriceCommand
    Implements ICommand

    Public Event CanExecuteChanged As EventHandler Implements ICommand.CanExecuteChanged

    Public Function CanExecute(parameter As Object) As Boolean Implements ICommand.CanExecute
        Return True
    End Function

    Public Sub Execute(parameter As Object) Implements ICommand.Execute
        ' CustomCommandParameterに指定したProductViewModelオブジェクトを取得します。
        Dim cp As CellCommandParameter = parameter
        Dim viewModel As ProductViewModel = cp.CustomCommandParameter
        ' ビューモデルのプロパティを更新します。
        viewModel.ProductName = viewModel.SelectedProduct.Name
        viewModel.ProductPrice = viewModel.SelectedProduct.Price
    End Sub
End Class
// 次の名前空間宣言を追加しています。
// using GrapeCity.Windows.SpreadGrid;

public class GetPriceCommand : ICommand
{
    public event EventHandler CanExecuteChanged;

    public bool CanExecute(object parameter)
    {
        return true;
    }

    public void Execute(object parameter)
    {
        // CustomCommandParameterに指定したProductViewModelオブジェクトを取得します。
CellCommandParameter cp = parameter as CellCommandParameter;
        ProductViewModel viewModel = cp.CustomCommandParameter as ProductViewModel;
        // ビューモデルのプロパティを更新します。
        viewModel.ProductName = viewModel.SelectedProduct.Name;
        viewModel.ProductPrice = viewModel.SelectedProduct.Price;
    }
}
ビューのコントロールにバインディング
最後に、ビューモデルで定義したプロパティや、コマンドをビューのコントロールにバインディングします。まずは、選択された製品の製品名と値段を表示する、TextBlockコントロールを次のように定義します。TextプロパティにProductViewModelクラスのProductNameとProductPriceプロパティをバインディングしています。
<StackPanel Orientation="Horizontal">
    <TextBlock Text="{Binding ProductName}" FontSize="20" Foreground="Red" VerticalAlignment="Bottom"/>
    <TextBlock Text=" の値段は " VerticalAlignment="Bottom"/>
    <TextBlock Text="{Binding ProductPrice}" FontSize="20" Foreground="Red" VerticalAlignment="Bottom"/
    <TextBlock Text=" 円です。" VerticalAlignment="Bottom"/>
</StackPanel>
次に、SPREADで選択された項目とProductViewModelクラスのSelectedProductプロパティをバインドします。SPREAD側での値選択がトリガーとなる双方向バインディングであるため、ModeプロパティはTwoWayにします。
<sg:GcSpreadGrid x:Name="gcSpreadGrid1" ItemsSource="{Binding Products}" SelectedItem="{Binding SelectedProduct, Mode=TwoWay}" AutoGenerateColumns="False">
    <sg:GcSpreadGrid.Columns>
        <sg:Column>
            <sg:Column.DataField>
                <sg:PropertyDataField Property="Code" />
            </sg:Column.DataField>
        </sg:Column>
        <sg:Column>
            <sg:Column.DataField>
                <sg:PropertyDataField Property="Name" />
            </sg:Column.DataField>
        </sg:Column>
    </sg:GcSpreadGrid.Columns>
</sg:GcSpreadGrid>
コードビハインドでの同じ設定は、以下のようなコードで可能です。
' 選択行にViewModelのSelectedProductプロパティをバインドします。
Dim selectedBinding = New Binding("SelectedProduct")
selectedBinding.Mode = BindingMode.TwoWay
GcSpreadGrid1.SetBinding(GcSpreadGrid.SelectedItemProperty, selectedBinding)
// 選択行にViewModelのSelectedProductプロパティをバインドします。
Binding selectedBinding = new Binding("SelectedProduct");
selectedBinding.Mode = BindingMode.TwoWay;
gcSpreadGrid1.SetBinding(GcSpreadGrid.SelectedItemProperty, selectedBinding);
そして、SPREADのボタン型セルにコマンドを設定します。ここでは、3列目にボタン型セルを設定します。ButtonCellTypeオブジェクトを作成し、CommandプロパティにはGetPriceCommandを、CustomCommandParameterプロパティには、ProductViewModelクラスのインスタンスを設定します。ボタン型セルの設定は、コードビハインドの方がわかりやすいです。
Class MainWindow
    Sub New()
        InitializeComponent()

        Dim viewModel As New ProductViewModel()
        Me.DataContext = viewModel

        ' 列の自動生成を無効にします。
        GcSpreadGrid1.AutoGenerateColumns = False

        ' Code、Name列のみ表示します。
        GcSpreadGrid1.Columns(0).DataField = New PropertyDataField() With {.Property = "Code"}
        GcSpreadGrid1.Columns(1).DataField = New PropertyDataField() With {.Property = "Name"}

        ' SPREADとビューモデルのデータコレクションをバインドします。
        Dim spreadBinding As New Binding("Products")
        GcSpreadGrid1.SetBinding(GcSpreadGrid.ItemsSourceProperty, spreadBinding)

        ' 選択行にビューモデルのSelectedProductプロパティをバインドします。
        Dim selectedBinding = New Binding("SelectedProduct")
        selectedBinding.Mode = BindingMode.TwoWay
        GcSpreadGrid1.SetBinding(GcSpreadGrid.SelectedItemProperty, selectedBinding)

        ' ボタン型セルを作成します。
        Dim Button As New ButtonCellType()
        Button.Content = "値段"
        ' ボタンにコマンドを設定します。
        Button.Command = New GetPriceCommand()
        Button.CustomCommandParameter = viewModel
        GcSpreadGrid1.Columns(2).CellType = Button
    End Sub
End Class
public MainWindow()
{
    InitializeComponent();

    ProductViewModel viewModel = new ProductViewModel();
    this.DataContext = viewModel;

    // 列の自動生成を無効にします。
    gcSpreadGrid1.AutoGenerateColumns = false;

    // Code、Name列のみ表示します。
    gcSpreadGrid1.Columns[0].DataField = new PropertyDataField() { Property = "Code" };
    gcSpreadGrid1.Columns[1].DataField = new PropertyDataField() { Property = "Name" };

    // SPREADとビューモデルのデータコレクションをバインドします。
    Binding spreadBinding = new Binding("Products");
    gcSpreadGrid1.SetBinding(GcSpreadGrid.ItemsSourceProperty, spreadBinding);

    // 選択行にビューモデルのSelectedProductプロパティをバインドします。
    Binding selectedBinding = new Binding("SelectedProduct");
    selectedBinding.Mode = BindingMode.TwoWay;
    gcSpreadGrid1.SetBinding(GcSpreadGrid.SelectedItemProperty, selectedBinding);

    // ボタン型セルを作成します。
    ButtonCellType button = new ButtonCellType();
    button.Content = "値段";
    // ボタンにコマンドを設定します。
    button.Command = new GetPriceCommand();
    button.CustomCommandParameter = viewModel;
    gcSpreadGrid1.Columns[2].CellType = button;
}
XAMLでボタン型セルにコマンドを設定するには、コマンドをリソースとして定義します。また、DataContextに設定しているProductViewModelクラスに名前をつけて、CustomCommandParameterプロパティに設定します。
<Window.DataContext>
    <local:ProductViewModel x:Name="productViewModel" />
</Window.DataContext>
<Window.Resources>
    <local:GetPriceCommand x:Key="getPriceCommand" />
</Window.Resources>
<StackPanel>
    <sg:GcSpreadGrid x:Name="gcSpreadGrid1" ItemsSource="{Binding Products}" SelectedItem="{Binding SelectedProduct, Mode=TwoWay}" AutoGenerateColumns="False">
        <sg:GcSpreadGrid.Columns>
            <sg:Column>
                <sg:Column.DataField>
                    <sg:PropertyDataField Property="Code" />
                </sg:Column.DataField>
            </sg:Column>
            <sg:Column>
                <sg:Column.DataField>
                    <sg:PropertyDataField Property="Name" />
                </sg:Column.DataField>
            </sg:Column>
            <sg:Column>
                <sg:Column.CellType>
                    <sg:ButtonCellType Content="価格" Command="{StaticResource getPriceCommand}" CustomCommandParameter="{x:Reference productViewModel}"  />
                </sg:Column.CellType>
            </sg:Column>
        </sg:GcSpreadGrid.Columns>
    </sg:GcSpreadGrid>
</StackPanel>
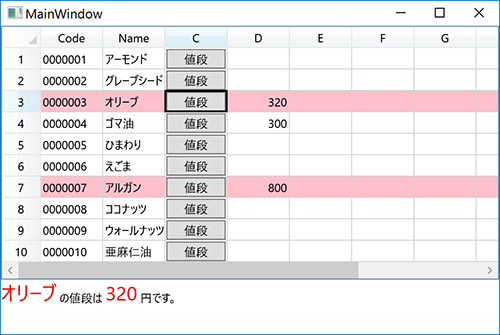
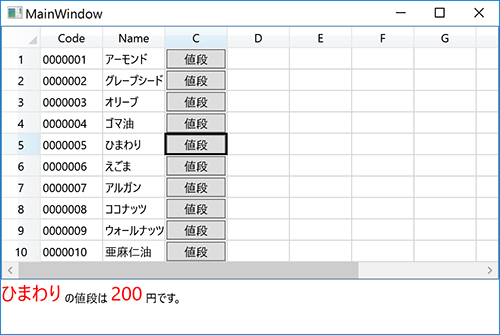
以上で完成です。実行し、知りたい製品の「値段」ボタンをクリックすると、次のように表示されます。
コマンドでSPREADを操作する
SPREADの行、列、セルを生成するRow、Column、Cellクラスのメンバは、依存関係プロパティを持っていません。そのため、これらのクラスのメンバをバインディングターゲットとすることができず、ビューモデルからセルや列に対して直接バインディングができません。しかし、ボタン型セルに設定したコマンドが実行されると、Executeメソッドのパラメータからは、セルの情報を保存したCellCommandParameterオブジェクトを取得できます。また、コマンドクラスにSPREADオブジェクトを示すプロパティを追加することで、コマンドによりSPREADを操作できるようになります。ここでは、そのテクニックについて紹介します。
「値段」ボタン型セルのクリックで、4列目に値段を表示し、さらに値段が300円以上の場合は、行の背景色を変更するというコマンドを作成します。
コマンドを変更する
先ほど作成したGetPriceCommandクラスを変更します。GcSpreadGridオブジェクトを示すプロパティを追加します。
Private _spread As GcSpreadGrid
Public Property spread As GcSpreadGrid
    Get
        Return _spread
    End Get
    Set(value As GcSpreadGrid)
        _spread = value
    End Set
End Property
private GcSpreadGrid _spread;
public GcSpreadGrid spread
{
    get { return _spread; }
    set { _spread = value; }
}
次に、Executeメソッドを変更します。パラメータ「parameter」から、ボタンが押されたセル情報を格納しているCellCommandParameterクラスを取得できます。CellCommandParameterクラスのCellPositionプロパティからボタンが押されたセルの行インデックスを取得できるため、変更を行いたいSPREADの行にアクセスすることができます。
Public Sub Execute(parameter As Object) Implements ICommand.Execute
    ' CustomCommandParameterに指定したProductViewModelオブジェクトを取得します。
    Dim cp As CellCommandParameter = parameter
    Dim viewModel As ProductViewModel = cp.CustomCommandParameter

    ' ビューモデルのプロパティを更新します。
    viewModel.ProductName = viewModel.SelectedProduct.Name
    viewModel.ProductPrice = viewModel.SelectedProduct.Price

    ' ボタン型セルの右側のセルに価格を表示します。
    _spread(cp.CellPosition.Row, cp.CellPosition.Column + 1).Value = viewModel.SelectedProduct.Price

    If _spread IsNot Nothing Then
        ' ボタン型セルの右側のセルに価格を表示します。
        _spread(cp.CellPosition.Row, cp.CellPosition.Column + 1).Value = viewModel.SelectedProduct.Price

        ' 価格が300円以上のものは、行の背景色を変更します。
        If viewModel.SelectedProduct.Price > 300 Then
            _spread.Rows(cp.CellPosition.Row).Background = Brushes.Pink
        End If
    End If
End Sub
public void Execute(object parameter)
{
    // CustomCommandParameterに指定したProductViewModelオブジェクトを取得します。
    CellCommandParameter cp = parameter as CellCommandParameter;
    ProductViewModel viewModel = cp.CustomCommandParameter as ProductViewModel;

    // ビューモデルのプロパティを更新します。
    viewModel.ProductName = viewModel.SelectedProduct.Name;
    viewModel.ProductPrice = viewModel.SelectedProduct.Price;

if (_spread != null)
    {
        // ボタン型セルの右側のセルに価格を表示します。
        _spread[cp.CellPosition.Row, cp.CellPosition.Column + 1].Value = viewModel.SelectedProduct.Price;

        // 価格が300円以上のものは、行の背景色を変更します。
        if (viewModel.SelectedProduct.Price > 300)
        {
            _spread.Rows[cp.CellPosition.Row].Background = Brushes.Pink;
        }
        else
        {
            _spread.Rows[cp.CellPosition.Row].Background = Brushes.White;
        }
    }
}
最後に、ビューでボタン型セルを生成するとき、Commandプロパティに設定するGetPriceCommandオブジェクトのspreadプロパティにGcSpreadGridオブジェクトを設定します。
' ボタン型セルを作成します。
Dim Button As New ButtonCellType()
Button.Content = "値段"
' ボタンにコマンドを設定します。
Button.Command = New GetPriceCommand() With {.spread = GcSpreadGrid1}
Button.CustomCommandParameter = viewModel
GcSpreadGrid1.Columns(2).CellType = Button
// ボタン型セルを作成します。
ButtonCellType button = new ButtonCellType();
button.Content = "値段";
// ボタンにコマンドを設定します。
button.Command = new GetPriceCommand() { spread = gcSpreadGrid1 };
button.CustomCommandParameter = viewModel;
gcSpreadGrid1.Columns[2].CellType = button;
XAMLでは、リソースとして定義したコマンドを次のように実装します。
<Window.Resources>
    <local:GetPriceCommand x:Key="getPriceCommand" spread="{x:Reference gcSpreadGrid1}"  />
</Window.Resources>
アプリケーションを実行し、いくつかボタン型セルをクリックすると、次のような結果となります。

コマンドのコンストラクタ引数を使用する
コマンドクラスから、ビューモデルやSPREADオブジェクトへアクセスする方法として、CustomCommandParameterプロパティの使用や、コマンドクラスへのプロパティ追加を紹介しましたが、この他に、コマンドクラスのコンストラクタ引数にオブジェクトを渡す方法も考えられます。ただし、XAMLにはコンストラクタに引数を渡す方法が用意されていないため、この方法はコードビハインドでの設定のみ有効です。まず、コマンドを定義するGetPriceCommandクラスを次のように実装します。
Public Class GetPriceCommand
    Implements ICommand

    ' SPREADとビューモデルを示すプロパティを定義します。
    Private _spread As GcSpreadGrid
    Private _viewModel As ProductViewModel

    ' 引数付きコンストラクタ
    Public Sub New(ByRef spread As GcSpreadGrid, ByVal viewModel As ProductViewModel)
        _spread = spread
        _viewModel = viewModel
    End Sub

    Public Event CanExecuteChanged As EventHandler Implements ICommand.CanExecuteChanged

    Public Function CanExecute(parameter As Object) As Boolean Implements ICommand.CanExecute
        Return True
    End Function

    Public Sub Execute(parameter As Object) Implements ICommand.Execute
        Dim cp As CellCommandParameter = parameter

        ' ビューモデルのプロパティを更新します。
        _viewModel.ProductName = _viewModel.SelectedProduct.Name
        _viewModel.ProductPrice = _viewModel.SelectedProduct.Price

        ' ボタン型セルの右側のセルに価格を表示します。
        _spread(cp.CellPosition.Row, cp.CellPosition.Column + 1).Value = _viewModel.SelectedProduct.Price

        ' 価格が300円以上のものは、行の背景色を変更します。
        If _viewModel.SelectedProduct.Price > 300 Then
            _spread.Rows(cp.CellPosition.Row).Background = Brushes.Pink
        End If
    End Sub
End Class
public class GetPriceCommand : ICommand
{
    public event EventHandler CanExecuteChanged;

    // SPREADとビューモデルを示すプロパティを定義します。
    private GcSpreadGrid _spread;
    private ProductViewModel _viewModel;

    // 引数付きコンストラクタ
    public GetPriceCommand(GcSpreadGrid spread, ProductViewModel viewModel)
    {
        _spread = spread;
        _viewModel = viewModel;
    }

    public bool CanExecute(object parameter)
    {
        return true;
    }

    public void Execute(object parameter)
    {
        CellCommandParameter cp = parameter as CellCommandParameter;

        //ビューモデルのプロパティを更新します。
        _viewModel.ProductName = _viewModel.SelectedProduct.Name;
        _viewModel.ProductPrice = _viewModel.SelectedProduct.Price;

        // ボタン型セルの右側のセルに価格を表示します。
        _spread[cp.CellPosition.Row, cp.CellPosition.Column + 1].Value = _viewModel.SelectedProduct.Price;

        // 価格が300円以上のものは、行の背景色を変更します。
        if (_viewModel.SelectedProduct.Price > 300)
        {
            _spread.Rows[cp.CellPosition.Row].Background = Brushes.Pink;
        }
        else
        {
            _spread.Rows[cp.CellPosition.Row].Background = Brushes.White;
        }
    }
}
ビュー側のボタン型セルの設定は、以下の通りです。Commandプロパティに設定するGetPriceCommandクラスのコンストラクタ引数に、SPREADオブジェクトとビューモデルのオブジェクトを渡します。
' ボタン型セルを作成します。
Dim Button As New ButtonCellType()
Button.Content = "値段"
' ボタンにコマンドを設定します。
Button.Command = New GetPriceCommand(GcSpreadGrid1, viewModel)
GcSpreadGrid1.Columns(2).CellType = Button
// ボタン型セルを作成します。
ButtonCellType button = new ButtonCellType();
button.Content = "値段";
// ボタンにコマンドを設定します。
button.Command = new GetPriceCommand(gcSpreadGrid1, viewModel);
gcSpreadGrid1.Columns[2].CellType = button;
以上で、前項と同様の動作を実現することができます。
まとめ
本記事では、SPREAD for WPFを使用して、シンプルなMVVMアプリケーションを作成する方法を紹介しました。SPREAD for WPFは、グリッドでありながら標準のDataGridやListBoxコントロールと異なり、ItemTemplateを持たないため、セルや行といった項目単位でバインディングすることができません。しかし、SPREADの持つ機能を利用して工夫することで、さまざまなコマンドを実装することも可能です。MVVMパターンの実装方法は多様で、実際の業務アプリケーションでは、もっと複雑な処理が必要となりますが、本記事での基本的な実装紹介が開発の一助となれば幸いです。


