本連載の書籍化について(2018年5月追記)
本連載は、加筆・再構成およびAndroid Studio 3対応を行い、書籍化しています。最新情報については、こちらもぜひ併せてご参照ください。
対象読者
- Androidアプリ開発未経験な方
- Java言語は一通り習得済みである方
サンプルプロジェクト作成
では、今回使用するサンプルアプリを作成していきましょう。
プロジェクト情報
以下が今回使用するサンプルアプリのプロジェクト情報です。
- Application name: HelloSample
- Company Domain: android.wings.websarva.com
- Package name: com.websarva.wings.android.hellosample
- Project location: C:\…任意のワークフォルダ…\HelloSample
- Phone and Tablet Minimum SDK: API 15
- Add an activity: Empty Activity
- Activity Name: HelloSampleActivity
- Layout Name: activity_hello_sample
画面作成
まず、strings.xmlファイル、および、activity_hello_sample.xmlファイルに以下のソースコードを記述してください。
<?xml version="1.0" encoding="utf-8"?>
<resources>

    <string name="app_name">イベントとリスナサンプル</string>
    <string name="tv_name">お名前を入力してください。</string>
    <string name="bt_click">表示</string>

</resources>
<?xml version="1.0" encoding="utf-8"?>
<LinearLayout xmlns:android="http://schemas.android.com/apk/res/android"
              android:layout_width="match_parent"
              android:layout_height="match_parent"
              android:orientation="vertical">

    <TextView
        android:layout_width="match_parent"
        android:layout_height="wrap_content"
        android:text="@string/tv_name"/>

    <EditText
        android:id="@+id/etName"
        android:layout_width="match_parent"
        android:layout_height="wrap_content"
        android:inputType="text"/>

    <Button
        android:id="@+id/btClick"
        android:layout_width="wrap_content"
        android:layout_height="wrap_content"
        android:text="@string/bt_click"/>

    <TextView
        android:id="@+id/tvOutput"
        android:layout_width="match_parent"
        android:layout_height="wrap_content"
        android:layout_marginTop="25dp"
        android:text=""
        android:textSize="25sp"/>

</LinearLayout>
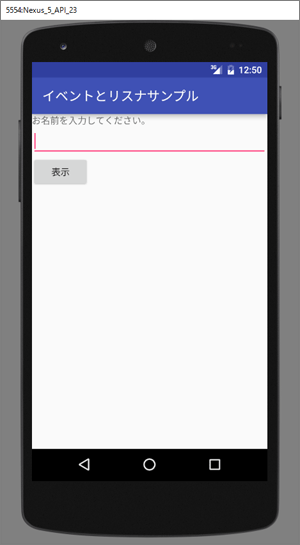
入力できた段階で、一度アプリを起動してみてください。以下のような画面が表示されるはずです。

この段階で「表示」ボタンをタップしても何も起こりません。アクティビティに何も処理を記述していないので当たり前ですが、入力欄に名前を入力してボタンをタップしたら、ボタンの下のTextViewに「○○さん、こんにちは!」と表示されるようにしていきます。


