


[4]WebRole1のプロパティ画面で、接続文字列を追加する
Windows Azureストレージへのアクセスのための接続文字列を追加します。
ソリューションエクスプローラから、AzureStorageBlobAndTableSampleクラウドサービスプロジェクト内のRoleフォルダにあるWebRole1を右クリックして、[プロパティ]を選択します。次に、表示されたプロパティ画面中の左側にある[Settings]タブをクリックします。そして、次の図5のように、Windows Azureストレージへのアクセスのための接続文字列を追加します。Nameは任意ですが、ここでは「DataConnectionString」としておきます。Typeは「ConnectionString」を選択し、Valueには「UseDevelopmentStorage=true」と入力してください。これにより、Development Storageの使用を指定します。
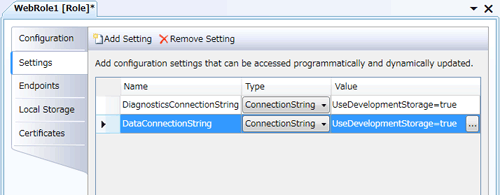
接続文字列の追加後、ソリューションエクスプローラから、AzureStorageBlobAndTableSampleクラウドサービスプロジェクト内のサービス定義ファイル(ServiceDefinition.csdef)を開いてみてください。
<?xml version="1.0" encoding="utf-8"?>
<ServiceDefinition name="AzureStorageBlobAndTableSample"
 xmlns="http://schemas.microsoft.com/ServiceHosting/2008/10/ServiceDefinition">
  <WebRole name="WebRole1">
    <InputEndpoints>
      <InputEndpoint name="HttpIn" protocol="http" port="80" />
    </InputEndpoints>
    <ConfigurationSettings>
      <Setting name="DiagnosticsConnectionString" />
      <Setting name="DataConnectionString" />
    </ConfigurationSettings>
  </WebRole>
</ServiceDefinition>
上記のリスト1の太字部分が示すように、WebRole1のプロパティ画面で追加した接続文字列の定義が反映されていることが分かります。
同様に、AzureStorageBlobAndTableSampleクラウドサービスプロジェクト内のサービス構成ファイル(ServiceConfiguration.cscfg)を開いてみます。
<?xml version="1.0"?>
<ServiceConfiguration serviceName="AzureStorageBlobAndTableSample"
 xmlns="http://schemas.microsoft.com/ServiceHosting/2008/10/ServiceConfiguration">
  <Role name="WebRole1">
    <Instances count="1" />
    <ConfigurationSettings>
      <Setting name="DiagnosticsConnectionString" value="UseDevelopmentStorage=true" />
      <Setting name="DataConnectionString" value="UseDevelopmentStorage=true" />
    </ConfigurationSettings>
  </Role>
</ServiceConfiguration>
上記のリスト2の太字部分が示すように、サービス構成ファイルには、追加した接続文字列の設定値が反映されていることが分かります。
これで、Windows Azureストレージ(ここでは開発環境のDevelopment Storage)へのアクセスが可能となりました。ちなみに、以前からのWindows Azure SDKを使用されていた読者は、DevelopmentStorageを使用するための設定が簡易になったことに気づかれたことと思います。
[5]Default.aspxにコントロールを配置する
画面のUIを作成します。
次の図6のように、Default.aspxにコントロールを配置します。上からFileUploadコントロール、2つのTextBoxコントロール、アップロード用にButtonコントロール、データ表示用にGridViewコントロールを貼り付けます。
![図6:Default.aspxの[デザイン]ビュー](http://cz-cdn.shoeisha.jp/static/images/article/5049/graph_06.gif)
[6]GridViewコントロールの設定
テーブルから取得したデータ表示のために、Default.aspxの[ソース]ビュー上で、GridViewコントロールを次のリスト3のように設定します。
<asp:GridView ID="GridView1" runat="server" AutoGenerateColumns="False">
    <Columns>
        <asp:TemplateField HeaderText="ユーザー名">
            <ItemTemplate>
                <asp:Label ID="Label1" runat="server"
                    Text='<%# HttpUtility.UrlDecode(Eval("PartitionKey").ToString()) %>'></asp:Label>
            </ItemTemplate>
        </asp:TemplateField>
        <asp:TemplateField HeaderText="タイトル">
            <ItemTemplate>
                <asp:Label ID="Label1" runat="server"
                    Text='<%# HttpUtility.UrlDecode(Eval("Title").ToString()) %>'></asp:Label>
            </ItemTemplate>
        </asp:TemplateField>
        <asp:TemplateField HeaderText="オリジナルファイル名">
            <ItemTemplate>
                <asp:Label ID="Label1" runat="server"
                    Text='<%# HttpUtility.UrlDecode(Eval("OriginalFileName").ToString()) %>'></asp:Label>
            </ItemTemplate>
        </asp:TemplateField>
        <asp:TemplateField HeaderText="アップロード日時(UTC)">
            <ItemTemplate>
                <asp:Label ID="Label1" runat="server"
                    Text='<%# Eval("UploadedAt") %>'></asp:Label>
            </ItemTemplate>
        </asp:TemplateField>
        <asp:TemplateField>
            <ItemTemplate>
                <asp:HyperLink ID="HyperLink1" runat="server"
                    NavigateUrl='<%# Eval("BlobUri")%>'>ダウンロード</asp:HyperLink>
            </ItemTemplate>
        </asp:TemplateField>
    </Columns>
</asp:GridView>
ItemTemplate要素内で参照している、PartitionKey、Title、OriginalFileName、UploadedAt、BlobUriが、次の手順7で解説するエンティティのプロパティに相当します。


