各コマンドの処理の作成
リボンの作成ができたら、各コマンドに処理を実装していきます。
ファイルを開く処理
アプリケーションメニューの[ファイルを開く]がクリックされた時の処理を作成します。このメニューは「RibbonButton1」というオブジェクトになっています。
ただし、このアプリケーションメニューは、フォームデザイナ上では一切表示されないので、Visual Basicではコードウィンドウの「オブジェクト」「イベント」リストからそれぞれ「RibbonButton1」「Click」を選んで作成します。
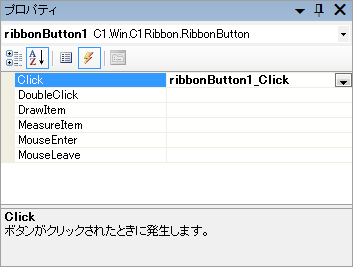
C#では、プロパティウィンドウの[イベント]ボタンを押して、「オブジェクト」リストから「ribbonButton1」を選んで、[Click]をダブルクリックしてイベントハンドラを作成します。

このメニューでは、OpenFileDialogでファイルを開くダイアログを表示し、選択したテキストファイルをRichTextBoxコントロールのLoadFileメソッドで開くだけです。
また、[終了]メニューは、プログラムを終了します。このメニューは、「ribbonButton2」オブジェクトになります。
Public Class RibbonForm1
    Public fsize As Integer = 10

    Private Sub RibbonButton1_Click(ByVal sender As Object, _
           ByVal e As System.EventArgs) Handles RibbonButton1.Click
        Dim fname As String
        Dim ret As Integer

        ret = Me.OpenFileDialog1.ShowDialog
        If DialogResult.OK Then
            fname = Me.OpenFileDialog1.FileName
            If fname <> "" Then
                Me.RichTextBox1.LoadFile(fname, _
                                     RichTextBoxStreamType.PlainText)
            End If
        End If
    End Sub

    Private Sub RibbonButton2_Click(ByVal sender As Object, _
             ByVal e As System.EventArgs) Handles RibbonButton2.Click
        Me.Close()
    End Sub
namespace myribbon
{
    public partial class RibbonForm1 : C1.Win.C1Ribbon.C1RibbonForm
    {
        public int fsize=10;
        public RibbonForm1()
        {
            InitializeComponent();
        }

        private void ribbonButton1_Click(object sender, EventArgs e)
        {
            String fname;
            DialogResult ret;

            ret = openFileDialog1.ShowDialog();
            if(ret == DialogResult.OK){
                fname = openFileDialog1.FileName;
                if(fname != ""){
                    richTextBox1.LoadFile(fname,
                                    RichTextBoxStreamType.PlainText);
                }
            }
        }

        private void ribbonButton2_Click(object sender, EventArgs e)
        {
            this.Close();
        }
フォントの属性設定の処理
次に、「ホーム」タブの3つのコントロールの処理を作成します。
カラーピッカーは、「RibbonColorPicker」というオブジェクトになります。ユーザーが色を選択すると、このコントロールの「Color」プロパティに色情報が格納されるので、RichTextBoxコントロールのSelectionColorプロパティに代入します。SelectionColorプロパティは、選択されている文字の色を設定するプロパティです。
Private Sub RibbonColorPicker1_Click(ByVal sender As System.Object, _
        ByVal e As System.EventArgs) Handles RibbonColorPicker1.Click
    Me.RichTextBox1.SelectionColor = RibbonColorPicker1.Color
End Sub
private void ribbonColorPicker1_Click(object sender, EventArgs e)
{
    richTextBox1.SelectionColor = ribbonColorPicker1.Color;
}
フォントサイズの変更のためのエディットボックスは、「RibbonEditBox」というオブジェクトになります。TextBoxコントロールと同じように入力データはTextプロパティに格納されます。
ユーザーがこのコントロールにデータを入力すると、コントロールにはChangeCommittedイベントが発生します。
ここでは、入力された文字サイズを整数値に変換して、新しいFontオブジェクトを作成してRichTextBoxコントロールのSelectionFontプロパティに設定します。
Private Sub RibbonEditBox1_ChangeCommitted(_
   ByVal sender As System.Object, ByVal e As System.EventArgs) _
      Handles RibbonEditBox1.ChangeCommitted
    fsize = Convert.ToInt32(RibbonEditBox1.Text)

    Dim fontname As String = RibbonFontComboBox1.Text
    Dim fnt As Font = New Font(fontname, fsize, FontStyle.Regular)
    Me.RichTextBox1.SelectionFont = fnt
End Sub
private void ribbonEditBox1_ChangeCommitted(object sender,
                                            EventArgs e)
{
    fsize = Convert.ToInt32(ribbonEditBox1.Text);

    string fontname = ribbonFontComboBox1.Text;
    Font fnt = new Font(fontname, fsize, FontStyle.Regular);
    richTextBox1.SelectionFont = fnt;
}
フォントの種類を選ぶコンボボックスは、「RibbonFontComboBox」というオブジェクトになります。ユーザーがリストから項目を選ぶと、「SelectedIndexChanged」イベントが発生し、選択項目名はTextプロパティに格納されます。
ここでは、選択されたフォント名から新しいFontオブジェクトを作成して、RichTextBoxコントロールのSelectionFontプロパティに設定します。
Private Sub RibbonFontComboBox1_SelectedIndexChanged(_
      ByVal sender As System.Object, ByVal e As System.EventArgs) _
      Handles RibbonFontComboBox1.SelectedIndexChanged
    Dim fontname As String = RibbonFontComboBox1.Text
    Dim fnt As Font = New Font(fontname, fsize, FontStyle.Regular)
    Me.RichTextBox1.SelectionFont = fnt
End Sub
private void ribbonFontComboBox1_SelectedIndexChanged(object sender,
                                                      EventArgs e)
{
    string fontname = ribbonFontComboBox1.Text;
    Font fnt = new Font(fontname, fsize, FontStyle.Regular);
    richTextBox1.SelectionFont = fnt;
}
編集タブのコピー・貼り付けボタンの処理
[編集]タブのコピー・貼り付けボタンは、それぞれ「RibbonButton3」「RibbonButton4」というオブジェクト名になります。
アプリケーションメニューのボタンから連番で番号が振られてそれぞれ違うオブジェクト名で識別されていますが、オブジェクトとしては同じ「RibbonButton」オブジェクトです。ユーザーがクリックするとClickイベントが発生します。
ここでは、RichTextBoxコントロールのCopy・Pasteメソッドを実行しています。
Private Sub RibbonButton3_Click(ByVal sender As System.Object, _
           ByVal e As System.EventArgs) Handles RibbonButton3.Click
    Me.RichTextBox1.Copy()
End Sub

Private Sub RibbonButton4_Click(ByVal sender As System.Object, _
           ByVal e As System.EventArgs) Handles RibbonButton4.Click
    Me.RichTextBox1.Paste()
End Sub
private void ribbonButton3_Click(object sender, EventArgs e)
{
    richTextBox1.Copy();
}

private void ribbonButton4_Click(object sender, EventArgs e)
{
    richTextBox1.Paste();
}
以上でできあがりです。
まとめ
MicrosoftがOffice 2007で導入した新しいGUIのリボンは、Windows VistaのGUIと合わせてこれまでにない外観をプログラムに実装できます。
この新しいGUIをプログラムに実装したいと思っている方は、ぜひPowerTools Ribbon for .NETのC1Ribbonコンポーネントを使ってみてください。


