はじめに
Androidの特徴や機能については、既にさまざまな形で取り上げられています。しかし、自作のアプリケーションを世に送り出し、他のユーザーのデバイスで動かすためには、アプリケーションの配布方法や対象のデバイスへの導入方法についても考えておかなくてはなりません。この記事では、ユーザーのデバイスへきちんと導入できるようにAndroidアプリケーションを準備する方法について説明します。
サンプルアプリケーションの開発
以降では、簡単なAndroidアプリケーションを使って、Androidデバイスへの配置方法を説明していきます。そこで、Eclipseを使って、新しいAndroidプロジェクトを作成します。
バージョン設定
Android SDKのバージョン1.0以降では、各AndroidアプリケーションのAndroidManifest.xmlファイルにandroid:versionCode属性とandroid:versionName attributes属性があります。
<manifest xmlns:android="http://schemas.android.com/apk/res/android"
      package="net.learn2develop.MyKillerApp"
      android:versionCode="1"
      android:versionName="1.0.0">
    <application android:icon="@drawable/icon"
        android:label="@string/app_name">
        <activity android:name=".MyKillerApp"
                  android:name ="@string/app_name">
            <intent-filter>
                <action android:name="android.intent.action.MAIN" />
                <category android:name="android.intent.category.LAUNCHER" />
            </intent-filter>
        </activity>
    </application>
</manifest>
android:versionCode属性はアプリケーションのバージョン番号を表します。アプリケーションに修正を加えるたびに、この値を1ずつ増やして、前のバージョンとプログラム的に区別できるようにします。Androidシステム自体はこの値を利用しませんが、アプリケーションのバージョン番号を取得するうえでこの値は有用です。
android:versionName属性はユーザーに提示するバージョン情報を表し、<major>.<minor>.<point>という形式で指定します。
Android Marketでアプリケーションを配布する予定の場合は、AndroidManifest.xmlファイルに以下の属性が必要です。
android:versionCodeandroid:versionNameandroid:nameandroid:name
さらに、アプリケーションでSDKの最小バージョン番号の指定が必要な場合は、AndroidManifest.xmlファイルで<uses-sdk>要素を使って次のように記述します。
<manifest xmlns:android="http://schemas.android.com/apk/res/android"
      package="net.learn2develop.MyKillerApp"
      android:versionCode="1"
      android:versionName="1.0.0">

    <uses-sdk android:minSdkVersion="1" />

    <application android:icon="@drawable/icon"
        android:label="@string/app_name">
        <activity android:name=".MyKillerApp"
                  android:label="@string/app_name">
            <intent-filter>
                <action android:name="android.intent.action.MAIN" />
                <category android:name="android.intent.category.LAUNCHER" />
            </intent-filter>
        </activity>
    </application>
</manifest>
現時点では、SDKのバージョンは1.0なので、最小バージョンの指定は必要ありません。
android:versionCode属性の値をプログラムで取得するには、PackageManagerクラスのgetPackageInfo()メソッドを使用します。実際に表示してみるには、main.xmlの<TextView>でidを次のように指定します。
<TextView
    android:id="@+id/textview"
    android:layout_width="fill_parent"
    android:layout_height="wrap_content"
    android:text="@string/hello"
    />
そして、MyKillerApp.javaで、アプリケーションのバージョン番号を取得するコードを次のように追加します。
    @Override
    public void onCreate(Bundle savedInstanceState) {
        super.onCreate(savedInstanceState);
        setContentView(R.layout.main);

        PackageManager pm = getPackageManager();
        try {
            //---get the package info---
            PackageInfo pi =
                pm.getPackageInfo("net.learn2develop.MyKillerApp", 0);
            //---display the versioncode---
            TextView tv = (TextView) findViewById(R.id.textview);
            tv.setText("VersionCode: " +Integer.toString(pi.versionCode));
        } catch (NameNotFoundException e) {
            // TODO Auto-generated catch block
            e.printStackTrace();
        }

    }
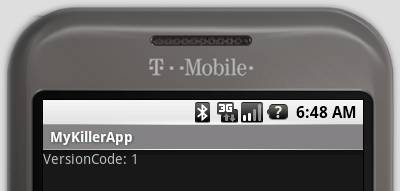
このアプリケーションを実行すると、android:versionCode属性の値が表示されます(図1を参照)。