


デザイナの使用
バーコードのデザインでは、コードから作成する以外に、専用のデザイナを使うことができます。
JBarCode 2.5Jをインストールすると、Windowsのスタートメニューに「バーコードデザイナ」というメニューが追加されています。これをクリックするとデザイナが起動します。
デザイナでは、バーコードのタイプや設定値、DPI、色、メッセージ文字列など、バーコード生成に必要なすべての設定を行うことができます。また、値を変更するたびにプレビューが更新され、設定結果を確認できるようになっています。
デザイナでの設定

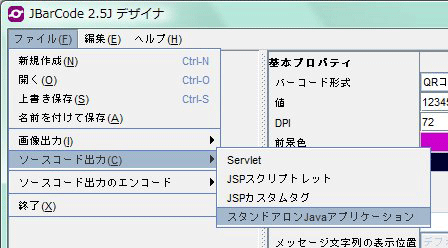
デザイン結果は、[ファイル-ソースコード出力]メニューを選ぶと、それぞれ組み込むプログラムごとのコードをファイルで、[ファイル-画像形式]メニューを選ぶと画像ファイルで取得できます。
出力するコードの形式を選ぶ
出力されたJavaアプリケーション用コード
import com.grapecity.barcode.BarCode;
import com.grapecity.barcode.valuetype.*;

import java.awt.Color;
import java.awt.Font;
import javax.swing.JFrame;

public class jbar {
    public static void main(String args[]) {
        BarCode barcode = new BarCode();
        barcode.setType(Type.QRCode);
        barcode.setValue("12345");
        try{
            barcode.setValueEncode("shift_jis");
        }catch(java.io.UnsupportedEncodingException e){
            e.printStackTrace();
        }
        barcode.setBarSize(new BarSize("87px, 87px"));
        barcode.setMessageFont(new Font("Dialog", Font.PLAIN, 12));
        barcode.setForeColor(new Color(0xcc00cc));
        barcode.setBackColor(new Color(0x000033));
        barcode.setOption(new OptionQRCode(OptionQRCode.Model2, OptionQRCode.ErrorLevel_L, -1, OptionQRCode.MaskAuto));

        JFrame frame = new JFrame();
        frame.getContentPane().add(barcode);
        frame.setDefaultCloseOperation(JFrame.EXIT_ON_CLOSE);
        frame.pack();
        frame.setSize(new java.awt.Dimension(300, 300));
        frame.setVisible(true);
    }
}
Servlet用コード
import com.grapecity.barcode.BarCode;
import com.grapecity.barcode.valuetype.*;

import java.awt.Color;
import java.awt.Font;
import javax.servlet.*;
import javax.servlet.http.*;

public class serv extends HttpServlet {
    public void service(HttpServletRequest request, HttpServletResponse response) {
        try{
            BarCode barcode = new BarCode();
            barcode.setType(Type.QRCode);
            barcode.setValue("12345");
            barcode.setValueEncode("shift_jis");
            barcode.setBarSize(new BarSize("87px, 87px"));
            barcode.setMessageFont(new Font("Dialog", Font.PLAIN, 12));
            barcode.setForeColor(new Color(0xcc00cc));
            barcode.setBackColor(new Color(0x000033));
            barcode.setOption(new OptionQRCode(OptionQRCode.Model2, OptionQRCode.ErrorLevel_L, -1, OptionQRCode.MaskAuto));

            ServletOutputStream out = response.getOutputStream();
            barcode.saveImage(out, BarCode.PNG);
        }catch(Exception e){
            e.printStackTrace();
        }
    }
}
JSPスクリプトレット用コード
<%@ page contentType="text/html; charset=utf-8"%>
<%@ page import = "com.grapecity.barcode.BarCode"%>
<%@ page import = "com.grapecity.barcode.valuetype.*"%>
<%@ page import = "java.awt.Color"%>
<%@ page import = "java.awt.Font"%>
<%

    BarCode barcode = new BarCode();
    barcode.setType(Type.QRCode);
    barcode.setValue("12345");
    barcode.setValueEncode("shift_jis");
    barcode.setBarSize(new BarSize("87px, 87px"));
    barcode.setMessageFont(new java.awt.Font("Dialog", Font.PLAIN, 12));
    barcode.setForeColor(new Color(0xcc00cc));
    barcode.setBackColor(new Color(0x000033));
    barcode.setOption(new OptionQRCode(OptionQRCode.Model2, OptionQRCode.ErrorLevel_L, -1, OptionQRCode.MaskAuto));
    String filename = new java.util.Date().getTime() + ".png";
    barcode.saveImage(application.getRealPath("/") + filename, BarCode.PNG);

%>
<html><body>
<img src="<%=filename%>" />
</body></html>
まとめ
JBarCode 2.5Jは、このようにとても簡単にバーコードを作成できます。
こうした機能を一から作るとなると、バーコードの規格から仕様までバーコードに関する専門の知識を必要としますが、JBarCode 2.5Jを使えば誰でも手軽にバーコード生成機能をプログラムに実装できるので、開発工数をぐっと縮めることができます。
製品情報

