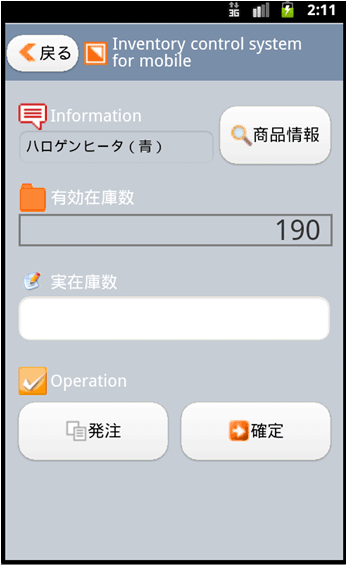
実装(第2画面)
詳細画面のソースコードを紹介します。項目が多いためソースコードは長いですが、ロジックは単純です。

画面クラス
では、画面クラスから確認してみましょう。
{import * from COM.CURL.CAEDE.TRANSLATOR.HTML.CLIENT}
{define-class public GamenBGraphic
{inherits Frame}
{constructor public {default}
{construct-super
{VBox
width = 480px,
height = 800px,
background = "#C6CDD5",
{HBox
width = 480px,
height = 80px,
background = "#798EA9",
valign = "center",
{CommandButton
name = "bt-modoru",
label = {VBox
{Fill},
{HBox
valign = "center",
{caede-image {url "./image/btn_modoru.gif"},
width = 32px, height = 32px},
"戻る"
},
{Fill}
},
font-size = 24px,
font-size = 24px,
width = 100px,
height = 50px
},
{Fill width = 5px},
{caede-image {url "./image/title.gif"}, width = 40px, height = 40px},
{Fill width = 5px},
{TextFlowBox color = "white", font-size = 24px, width = 300px,"Inventory control system for mobile" }
},
{HBox
{Fill width = 20px},
{VBox
{Fill height = 30px},
{HBox
{VBox
{HBox
valign = "center",
{caede-image {url "./image/i_info.gif"}, width = 40px, height = 40px},
{Fill width = 5px},
{TextFlowBox color = "white", font-size = 24px, "Information" }
},
{HBox
||商品名称
{TextDisplay
border-color= "#C6CDD5",
border-style = "none"
background = "#C6CDD5",
name = "td-sname" ,
font-size = 20px,
width = 260px,
height = 30px
}
}
},
{Fill},
{VBox
||商品情報画面遷移ボタン
{CommandButton
name = "bt-shohin",
label = {VBox
{Fill},
{HBox
valign = "center",
{caede-image {url "./image/btn_shohin-004.gif"},
width = 32px, height = 32px
},
"商品情報"
},
{Fill}
},
font-size = 24px,
width = 155px,
height = 80px
}
},
{Fill width = 20px}
},
{Fill height = 30px},
{HBox
width = 460px,
valign = "center",
{caede-image {url "./image/i_yuko.gif"}, width = 40px, height = 40px},
{Fill width = 5px},
{TextFlowBox color = "white", font-size = 24px, "有効在庫数" }
},
{HBox
width = 480px,
height = 50px,
||有効在庫数
{VBox
border-color= "gray",
border-style = "flat"
background = "#C6CDD5",
name = "td-yukosu" ,
halign = "right",
width = 440px,
height = 40px,
{Fill},
{HBox
{TextFlowBox font-size = 40px, height = 40px, "190" },
{Fill width = 20px}
},
{Fill}
},
{Fill width = 20px}
},
{Fill height = 30px},
{HBox
width = 460px,
valign = "center",
{caede-image {url "./image/i_jitsu.gif"}, width = 40px, height = 40px},
{Fill width = 5px},
{TextFlowBox color = "white", font-size = 24px, "実在庫数" },
{Fill}
},
{HBox
width = 460px,
||実在庫数
{TextField
font-size = 20pt,
name = "tf-zaikosu" ,
width = 420px,
height = 40px
},
{Fill width = 20px}
},
{Fill height = 60px},
{HBox
width = 480px,
valign = "center",
{caede-image {url "./image/i_ope.gif"}, width = 40px, height = 40px},
{Fill width = 5px},
{TextFlowBox color = "white", font-size = 24px, "Operation" }
},
{HBox
background = "#C6CDD5",
height = 120px,
||発注依頼画面へ遷移するボタン
{CommandButton
name = "bt-hachu",
label = {VBox
{Fill},
{HBox
valign = "center",
{caede-image {url "./image/btn_hachu.gif"},
width = 32px, height = 32px},
"発注"
},
{Fill}
},
font-size = 24px,
width = 210px,
height = 80px
},
{Fill},
||確定ボタン
{CommandButton
name = "bt-kakutei",
label = {VBox
{Fill},
{HBox
valign = "center",
{caede-image
{url "./image/btn_kakutei.gif"},
width = 32px, height = 32px
},
"確定"
},
{Fill}
},
font-size = 24px,
width = 210px,
height = 80px
},
{Fill width = 20px}
}
}
}
}
}
}
}
先ほど紹介していないオブジェクトとしては、次のようなものを使っています。
- TextDisplay:単一行の編集不可能なテキストエントリボックス
- CommandButton:基本的なプッシュボタンコントロール
これらのオブジェクトでは、Curl言語では良く利用します。今回は、手書きでオブジェクトを並べてレイアウトを作成しましたが、CurlにはVLEと呼ばれるレイアウト作成エディタが存在しており、グラフィカルにレイアウトを作成できます(※現時点のCaedeでは、VLE機能は提供されていません)。
また、このようにレイアウトを定義した場合でも、作成されるソースコードはテキストベースであることもCurlの特徴となります。レイアウトのちょっとした修正をしたい場合、わざわざレイアウト作成エディタを用いなくても、テキストエディタで修正することが可能です。
画面コントロールクラス
続いて、詳細画面の画面コントロールクラスから確認してみましょう。
{define-class public GamenBScreen  {inherits {Screen-of GamenBGraphic}}

  field td-sname:TextDisplay
  field td-zaikosu:TextDisplay
  field tf-zaikosu:TextField
  field td-yuko:TextDisplay
  field td-yukosu:TextDisplay
  field bt-kakutei:CommandButton
  field bt-hachu:CommandButton
  field bt-modoru:CommandButton

  {constructor public {default}
    set self.td-sname = {self.find-graphic-by-name "td-sname"} asa TextDisplay
    set self.td-zaikosu = {self.find-graphic-by-name "td-zaikosu"} asa TextDisplay
    set self.tf-zaikosu = {self.find-graphic-by-name "tf-zaikosu"} asa TextField
    set self.td-yuko = {self.find-graphic-by-name "td-yuko"} asa TextDisplay
    set self.td-yukosu = {self.find-graphic-by-name "td-yukosu"} asa TextDisplay
    set self.bt-kakutei = {self.find-graphic-by-name "bt-kakutei"} asa CommandButton
    set self.bt-hachu = {self.find-graphic-by-name "bt-hachu"} asa CommandButton
    set self.bt-modoru = {self.find-graphic-by-name "bt-modoru"} asa CommandButton
    ||戻るボタン押下時の処理
    {self.bt-modoru.add-event-handler
        {on Action do
            {self.change-page GamenAScreen} ||明細画面へ遷移する
        }
    }
    ||確定ボタン押下時の処理
    {self.bt-kakutei.add-event-handler
        {on Action do
            {if self.tf-zaikosu.value == "" then
                {popup-message "入力してください。"}
             else
                {popup-message "確定しました。"}
                {self.change-page GamenAScreen} ||明細画面へ遷移する
            }
        }
    }
    ||発注依頼ボタン押下時の処理
    {self.bt-hachu.add-event-handler
        {on Action do
            {popup-message "発注を依頼しました。"}
            ||TODO:発注指示の処理・・・・
        }
    }
  }
  ||画面遷移時の処理
  {method public {on-page-changed
                     data:any
                 }:void
    ||明細画面より渡されたパラメータを設定する。
    set self.td-sname.value = data asa String
  }
}
ボタン押下時の処理や、画面遷移時の処理を定義しています。簡易的なメッセージダイアログを出力するには、 {popup-message}プロシージャを用います。このプロシジャもCurlでは御馴染みのAPIです。画面遷移時の処理は、 on-page-changedメソッドをオーバライドして定義します。
||画面遷移時の処理
{method public {on-page-changed
                 data:any
             }:void
||明細画面より渡されたパラメータを設定する。
set self.td-sname.value = data asa String
}
上記例では、遷移元画面で設定したパラメータを受け取り、td-snameオブジェクトに設定しています。
今回の例では、発注ボタン押下時の処理や、商品情報ボタン押下時の処理を定義していませんが、通常はこのクラスにて業務ロジック(画面コントロールロジック)を定義することになります。


