パート2 データモデルの実装
前回の記事では、正規化されたデータモデルのメリットとデメリットについて説明しました。正規化されたモデルと正規化されていないモデルのそれぞれについて、基本的なデザインを述べました。その説明は、抽象的な言葉や一般的な言い回しを用いたものでした。今回の記事では、このモデルの肝心な部分に迫っていきます。すなわち、実際の現場における実装の詳細と、実際のテーブルレイアウトについて述べていきます。
復習
パート1の記事では、ユーザー定義のデータモデルを使用することのメリットを述べました。顧客が独自の属性を管理でき、アプリケーションに縛られることもないし、アップグレードのための開発にコストをかける必要もないというものでした。簡単な変更であれば、これでうまくいきます。サンプルとしては、椅子のデータベースに対し、最初のデザイン要件にはなかった新しい属性を追加するという例を取り上げました。静的なデータモデルを使用した場合、データモデルの変更が必要であり、そのときにはアプリケーションの修正が必要となるのが普通です。
紹介したモデルを使用すると、こうした変更を大幅に抑えることができます。
データモデルの詳細
今回の記事では、そうした変更に対応できるようにアプリケーションとデータモデルを定義するにはどうすればよいかという点を詳しく取り上げます。前回の記事では抽象的な言い回しで説明しましたが、今回は具体的な実装に取り組んでいくことにします。
前回は椅子を例に取り上げました。今回はその延長として、自社の顧客であるオフィス管理会社向けに一連の家具を定義するという例を考えてみましょう。その会社の顧客ベースに対し、一連のオフィス製品を定義する必要があるとします。その際、同社の顧客たちのさまざまな要件に対応できるようにし、またエンドユーザーが、自身の持つ製品の一覧を参照できるようにしたいものとします。
まずは、顧客の世界にある、一連の大きな「オブジェクト」を定義するところから始めることにしましょう。ここでは、単純化して考えて、椅子(chair)、机(desk)、鉢植え(plant)があるものとします。
これら各項目のそれぞれについて、標準のテーブル構造を次のように定義します。
- 各項目に対応するマスターテーブルがある
- 一意のID列
- 作成時刻のタイムスタンプ列
- 作成者のID列
- 修正時刻のタイムスタンプ列
- 修正者のID列
- 各項目に対応する属性テーブルがある
- 一意の属性ID列
- マスターテーブルに対するリレーション
- 属性の型ID
- 属性値
- 作成時刻のタイムスタンプ列
- 作成者のID列
- 修正時刻のタイムスタンプ列
- 修正者のID列
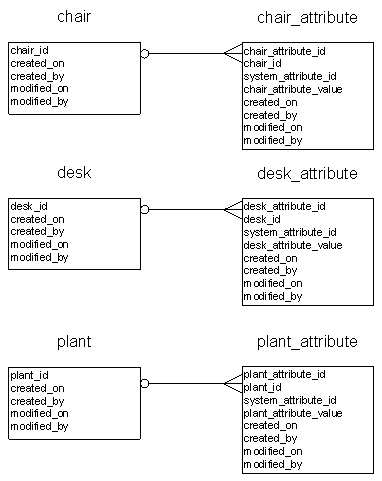
テーブル自体は次のようなものです。

SQLは次のようなものです。
create table chair (
    chair_id bigint not null identity (1,1),
    created_on smalldatetime,
    created_by bigint,
    modified_on smalldatetime,
    modified_by bigint)

alter table chair add
    constraint pk_chair primary key  clustered
    (
        chair_id
    )
create table chair_attribute (
    chair_attribute_id bigint not null identity (1,1),
    chair_id bigint not null,
    system_attribute_id bigint not null,
    chair_attribute_value,
    created_on smalldatetime,
    created_by bigint,
    modified_on smalldatetime,
    modified_by bigint)

alter table chair_attribute add
    constraint pk_chair_attribute primary key clustered
    (
        chair_attribute_id
    )
また、メタデータテーブルを定義する必要があります。ここでは、「system_attribute」テーブルという名前にします。このテーブルは、データベース全体に対応するすべての属性の定義を保持し、またデータの整合性を確保するためのいくつかの条件を定義しています。
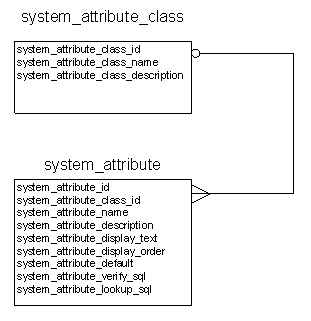
「system_attribute」テーブルは、「system_attribute_class」テーブルによりグループ分けされています。
これらのテーブルは次のようなものです。

「system_attribute_class」テーブルにより、データベースに含まれる属性を簡単にグループ分けできます。この例で言えば、椅子と鉢植えの区分けなどです。これは、検索を行うときに、テーブル内の属性を見つけやすくするためだけのものです。
一方、「system_attribute」テーブルは、システム全体の要となるテーブルです。ユーザーインターフェイスやデータモデルの制御、さらには、アプリケーションコードの制御は、このテーブルで取り仕切られることになります。
このテーブルには、以下のような名前の列があります。
SYSTEM_ATTRIBUTE_ID
SYSTEM_ATTRIBUTE_CLASS_ID
SYSTEM_ATTRIBUTE_NAME
chair_colorやdesk_styleがあります。SYSTEM_ATTRIBUTE_DESCRIPTION
system_attribute_nameがchair_colorであれば、そのとき何を考えていたのか非常に思い出しやすいですが、chair_nbr_legとなると、少し混乱します。私は通常、この列はアプリケーション内で表示しませんが、ツールチップとして表示するという手もあります。SYSTEM_ATTRIBUTE_DISPLAY_TEXT
SYSTEM_ATTRIBUTE_DISPLAY_ORDER
SYSTEM_ATTRIBUTE_DEFAULT
SYSTEM_ATTRIBUTE_VERIFY_SQL
SYSTEM_ATTRIBUTE_LOOKUP_SQL
T-SQLによるアシスト
次に必要なのは、データに簡単にアクセスできるようにするための方法です。そのために、標準で設定されたストアドプロシージャを定義しておくことにします。レコードのアクセス、削除、編集、および挿入のときには、そのストアドプロシージャを使用します。
次のような名前付け規則でストアドプロシージャを作成します。
- <table>_get
- <table>_insert
- <table>_update
- <table>_delete
したがって、ストアドプロシージャの名前は次のとおりとなります。
chair_get;chair_insert;chair_update;chair_deletechair_attribute_get;chair_attribute_insert;chair_attribute_update;chair_attribute_delete
これらのSQL構文は次のとおりです。
create procedure chair_get
    @chair_id bigint
as
    select * from chair where chair_id = @chair_id
create procedure chair_insert
    @created_by bigint,
    @chair_id bigint output
as
    insert into chair (created_by, created_on)
        values (@created_by, getdate())

    if @@ERROR <> 0
        begin
            -- not good, we need to reset the
            -- chair id and return the error
            @chair_id = 0
            return @@ERROR
        end
    else
        begin
            @chair_id = @@IDENTITY
            return 0
        end
create procedure chair_update
    @chair_id bigint,
    @modified_by bigint
as
    -- update the chair table, we only need
    -- to touch the modified columns since
    -- that's the only real data here
    update chair
        set
            modified_by = @modified_by,
            modified_on = getdate()
            where chair_id = @chair_id
        if @@ERROR = 0
            return 0
        else
            return @@ERROR
また、このストアドプロシージャを修正して、監査証跡を処理させることもできます。属性処理の関数を見るとわかるように、属性を変更するときには必ずこのプロシージャを呼び出しますので、誰がいつどのような変更を加えたかを追跡する簡単な監査証跡を作成することが可能です。とりあえずは、最終変更を記録するだけの単純なものにしておきましょう。
create procedure chair_delete
    @chair_id bigint
as
    -- delete the attributes before we move ahead
    delete chair_attribute where chair_id = @chair_id

    if @@ERROR <> 0
        return @@ERROR

    -- OK, we can proceed
    delete chair where chair_id = @chair_id

    return @@ERROR
属性処理のストアドプロシージャは少しだけ複雑です。「system_attribute」テーブルを参照したうえで、メイン項目のテーブルを参照するからです。
create procedure chair_attribute_get
    @chair_id bigint
    -- said is short for system_attribute_id
    @chair_said bigint = 0
as
    -- get all the attributes for this chair
    if @chair_said = 0
        select
            chair_id,
            chair.modified_on chair_modified_on,
            chair.modified_by chair_modified_by,
            chair.created_on chair_created_on,
            chair.created_by chair_created_by,
            chair_attribute_value,
            system_attribute_name,
            system_attribute_description,
            system_attribute_display_text,
            system_attribute_display_order,
            ca.modified_on chair_attribute_modified_on,
            ca.modified_by chair_attribute_modified_by,
            ca.created_on chair_attribute_created_on,
            ca.created_by chair_attribute_created_by,
            ca.chair_attribute_id
        from chair
            left join chair_attribute ca on
                ca.chair_id = chair.chair_id
            left join system_attribute sa on
                sa.system_attribute_id =
                    ca.system_attribute_id
        where chair.chair_id = @chair_id
    else -- we want a particular said only
        select
            chair_id,
            chair.modified_on chair_modified_on,
            chair.modified_by chair_modified_by,
            chair.created_on chair_created_on,
            chair.created_by chair_created_by,
            chair_attribute_value,
            system_attribute_name,
            system_attribute_description,
            system_attribute_display_text,
            system_attribute_display_order,
            ca.modified_on chair_attribute_modified_on,
            ca.modified_by chair_attribute_modified_by,
            ca.created_on chair_attribute_created_on,
            ca.created_by chair_attribute_created_by,
            ca.chair_attribute_id
        from chair
            left join chair_attribute ca on
                ca.chair_id = chair.chair_id
            left join system_attribute sa on
                sa.system_attribute_id =
                    ca.system_attribute_id
        where
            chair.chair_id = @chair_id and
            ca.system_option_id = @chair_said
上記のストアドプロシージャでは、当該の椅子に対応するすべての属性のリストを取得するか、またはデータベースに対して特定の属性を要求できます。
create procedure chair_attribute_insert
    @chair_id bigint,
    @said bigint,
    @chair_attribute_value varchar(8000),
    @created_by bigint,
    @chair_attribute_id bigint output,
    @error_text varchar(500) output
as

/* first we need to test that the
passed value is legal  */

-- is there a verify for this said?
declare @sp_name varchar(255),
    @sp_text varchar(500),
    @verify_status

select @sp_name = system_attribute_verify_sql
    from system_attribute
    where system_attribute_id = @said

/*
if sp_name is filled, then we have something to test
all of the verify stored procedures take one value
and return a 0 or a 1.  0 means the value is OK,
1 means the value failed.
The procedures take 2 parameters, the value in and
an output parameter with the error text.
*/
if @sp_name <> ''  begin
    exec @verify_status = @sp_name
      @chair_attribute_value, @sp_text output
    if @verify_status = 1  begin
        -- we have a failure in the verify process
        set @error_text = @sp_text
        return 1
end

-- we were either successful in the verify
-- or didn't need to
insert into chair_attribute
 (chair_id, chair_attribute_value, system_attribute_id,
  created_by, created_on)
 values
 (@chair_id, @chair_attribute_value, @said,
  @created_by, getdate())
    if @@ERROR = 0
        set @chair_attribute_id = @@IDENTITY
        -- mark the chair itself as modified
        exec chair_update @chair_id, @created_by
end -- end verify_status = 0
上記のストアドプロシージャは、見てのとおり、かなり複雑になっています。検査用のプロシージャがある場合は、データベースから取得し、実行する必要があるからです。検査に成功した場合は、続いて挿入処理を実行します。
検査に失敗した場合は、プロシージャが返したテキストを記録し、アプリケーションに戻す必要があります。ユーザーに対してインテリジェントな応答を返すためです。返される文字列は、「Error out of range. Only a number between 1 and 10 is allowed(範囲外エラー。1~10の数値のみ有効です)」といったものです。アプリケーションはこれをユーザーに表示し、値を修正してもらうことができます。
続いて、親項目(この場合は椅子)にアクセスして、修正された情報を設定する必要があります。
最後に、処理を終了し、呼び出し元のアプリケーションに0を返します。
create procedure chair_attribute_update
    @chair_attribute_id bigint,
    @chair_id bigint,
    @said bigint,
    @modified_by bigint,
    @error_text
as
    /* We need to verify the value first */
    declare @sp_name varchar(255),
        @sp_text varchar(500),
        @verify_status

select @sp_name = system_attribute_verify_sql
    from system_attribute
    where system_attribute_id = @said

/*
  if sp_name is filled, then we have something to
  test all of the verify stored procedures take
  one value and return a 0 or a 1.  0 means the
  value is OK, 1 means the value failed.
  The procedures take 2 parameters, the value in
   and an output parameter with the error text.
*/
if @sp_name <> ''  begin
    exec @verify_status = @sp_name
      @chair_attribute_value, @sp_text output
    if @verify_status = 1  begin
        -- we have a failure in the verify process
        set @error_text = @sp_text
        return 1
end

    /* if we made it this far, we're OK */
    update chair_attribute
    set
        chair_attribute_value = @chair_attribute_value,
        chair_id = @chair_id,
        system_attribute_id = @said,
        modified_by = @modified_by,
        modified_on = @modified_on
    where
        chair_attribute_id = @chair_attribute_id

    /* we need to touch the parent */
    exec chair_update @chair_id, @modified_by

    -- we can simply return the @@ERROR here
    return @@ERROR
上記のプロシージャは、挿入処理のプロシージャに非常によく似ています。渡された値が有効であることを確認したうえで、項目を更新します。現在の属性項目のIDを渡す必要があり、それに応じて、レコードの任意の項目を変更できます。
こちらも、修正の時刻とユーザーを追跡するために、親項目(椅子)にアクセスする必要があります。
create procedure chair_attribute_delete
    @chair_attribute_id bigint,
    @modified_by bigint
as

    /* we need to get the parent item before we continue */
    declare @chair_id bigint
    select @chair_id = chair_id from chair_attribute
      where chair_attribute_id = @chair_attribute_id

    delete chair_attribute
      where chair_attribute_id = @chair_attribute_id
    if @@ERROR = 0
        exec chair_update @chair_id, @modified_by
    return @@ERROR
削除処理のプロシージャでは、削除するレコードの現在の親項目をまず判断したうえで、レコードを削除し、親にアクセスします。
次回予告
次回の記事では、このモデルのアプリケーション側を掘り下げていくことにします。ユーザーインターフェイスの構築や、Visual Studioのツールを使用してすばやく簡単にデータにアクセスする方法について解説します。
また、検査処理のストアドプロシージャについても掘り下げていき、その設定方法や使用方法について説明します。


