はじめに
地図表示機能は、今日のモバイル端末にとって必須の機能となりました。新技術の発展により、モバイル端末(とりわけ携帯電話)の能力は、複雑な数値計算処理を単体で行ったり、サーバーとの大容量通信を行ったりするのに十分なレベルに達しています。
地図表示機能と言えばかつてはGPS機器が主役でしたが、今ではほぼ完全なGPS機能を提供するモバイル端末が非常に増えてきています。GoogleのAndroidでは、Googleのよく知られた地図表示ツールに直接アクセスできます。本稿では、この地図機能を利用するための主なプログラミングAPIを見ていきます。
地図表示用の各種Google API
まず、必要な開発ツール、プラグイン、サンプルコードはすべてGoogle AndroidのWebサイトにあります。このWebサイトには、利用にあたってのわかりやすい説明も掲載されています。まだご覧になっていなければ、ご一読されることをお勧めします。
地図表示APIの大半は、com.google.android.mapsパッケージ内にあります。ソフトウェアに地図ツールを組み込むには、MapActivityとMapViewの最低限2つのAPIが必要です。MapActivityは、MapViewの背後でアクティビティのライフサイクルとサービスを管理します。MapViewは、Androidで地図を表示するビューです。これらのAPIのほかに、地図の移動と拡大縮小を行うMapControllerもあります。MyLocationOverlayとOverlayは、地図上にユーザーの設定した情報やオブジェクトを描画するのに使用します。
地図表示を語るうえで、GPSの存在を忘れるわけにはいきません。GPSは今やモバイル端末に欠かせない機能の1つとなっているからです。そこでGPSサポート用には、android.locationパッケージが用意されています。LocationManagerは最も重要なAPIであり、システムロケーションサービスへのアクセスを行います。地図表示とGPSのAPIは、位置情報サービス(LBS)を行うためには欠かせないものです。以降で紹介するサンプルでは、こうしたAPIをできるだけ多く取り上げます。
MapActivityでMapViewを生成する
MapViewを生成できるのはMapActivityだけです。なぜなら、MapViewはネットワークとファイルシステムにアクセスするバックグラウンドスレッドに依存しており、このバックグラウンドスレッドはMapActivityによって管理されているからです。そのため、まず次のようにMapActivityを継承するクラスを作成する必要があります。
public class TutorialOnMaps extends MapActivity {
   private static MapView mMapView;

   /** Called when the activity is first created. */
   @Override
   public void onCreate(Bundle icicle) {
      super.onCreate(icicle);

      requestWindowFeature(Window.FEATURE_NO_TITLE);
      setContentView(R.layout.main);

      // Get the map view from resource file
      mMapView = (MapView)findViewById(R.id.mv);
      }
   }
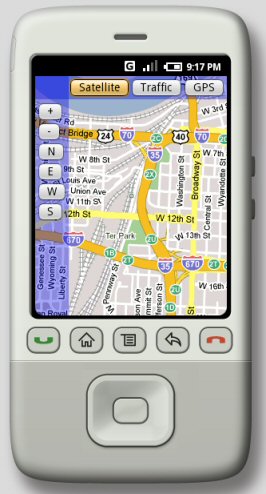
デフォルトのリソースファイルmain.xml内で、透明なパネルを使ったオンスクリーンボタンをいくつか追加していきます。MapViewを正しく作成するために、Android開発者の間でよく知られている方法を使って、MapViewの宣言を行います。図1に、オンスクリーンボタンを追加したエミュレータの初期画面を示します。
<?xml version="1.0" encoding="utf-8"?>

<FrameLayout xmlns:android=
   "http://schemas.android.com/apk/res/android"
   android:layout_width="fill_parent"
   android:layout_height="fill_parent"
   >

<view id="@+id/mv"
   class="com.google.android.maps.MapView"
   android:layout_width="fill_parent"
   android:layout_height="fill_parent"
   android:layout_weight="1" />

<LinearLayout xmlns:android=
   "http://schemas.android.com/apk/res/android"
   android:orientation="horizontal"
   android:layout_width="fill_parent"
   android:layout_height="wrap_content"
   android:background="#550000ff"
   android:padding="2px"
   >
<Button id="@+id/sat"
   android:layout_width="wrap_content"
   android:layout_height="wrap_content"
   android:layout_marginLeft="40px"
   android:text="Satellite" />
(...snipped)
</LinearLayout>

<LinearLayout xmlns:android=
   "http://schemas.android.com/apk/res/android"
   android:orientation="vertical"
   android:layout_width="wrap_content"
   android:layout_height="fill_parent"
   android:background="#550000ff"
   android:padding="2px"
   >
<Button id="@+id/zin"
   android:layout_width="wrap_content"
   android:layout_height="wrap_content"
   android:layout_marginTop="30px"
   android:text="+" />
(...snipped)
</LinearLayout>

</FrameLayout>


