


Imagickによる画像サイズ変換
前ページで作成した端末サイズ取得クラスを使用して画面の幅を取得します。
$dm = & new DeviceManager();
$width = $dm->getDisplay()->_width;
画像変換PHPは「file.php?file=xxx.jpg」の形式で呼び出せるものとします。
[リスト2]file.pp
require_once 'DeviceManager.class.php';

// ファイル名取得
$image_file = $_GET['file'];

// 拡張子取得
$data = pathinfo($image_file);
$ext = $data['extension'];

// 画像ファイルサイズを取得
list($file_width, $file_height, $file_type, $file_attr) = getimagesize($image_file);

// 画像ファイルmime_type取得
$file_info = getimagesize($image_file);
$file_mime = $file_info['mime'];

// DeviceManagerクラス
$dm = & new DeviceManager();
// 携帯画面の横サイズを取得します
$width = $dm->getDisplay()->_width;

// 画像ファイルの横のサイズが携帯画面の横サイズより大きな場合にサイズ変換を行います
if($file_width > $width){
    // サイズ変換後の画像ファイルが既に存在する場合
    $file_name = $width . '_' . $image_file;
    $file_path = 'images/'.$file_name;
    if(file_exists($file_path)){
        header('Content-type: '.$file_mime);
        echo readfile($file_path);
        exit;
    }
    // 縦を0にして縦横比同じ割合でサイズ変換
    $height = 0;
    // Imagickを利用
    $image = new Imagick();
    // サイズ変換前の画像ファイルを読込
    $image->readImageBlob(file_get_contents($image_file));
    // 画像種別を指定
    $image->setImageFormat($ext);
    // サイズを変換
    $image->thumbnailImage($width,$height);
    // 圧縮品質設定
    $image->setCompressionQuality(80);
    // サイズ変換した画像をimagesフォルダに保存
    $image->writeImage($file_path);
    // mime_type 指定
    header('Content-type: '.$file_mime);
    echo $image;
}else{
    header('Content-type: '.$file_mime);
    echo readfile($image_file);
}
名前に「横サイズ+ファイル名」という規則性を持たせて保存することで次回以降は変換を行わない形式にしています。画像変換前にファイルの存在をチェックして、存在すれば画像サイズ変換を行わずそのまま表示します。
テスト
実機でのテストを行う前にデバッグを兼ねる意味で、Firefoxからアクセスしてテストを行います。
Firefoxの携帯シュミレーターアドオンFireMobileSimulatorをFireMobileSimulator.orgよりインストールします。インストールに[ツールバー]→[FireMobileSimulator]→端末名を選択することにより選択した端末のシュミレーターとしてFirefoxを利用できます。
[ツールバー]→[FireMobileSimulator]→端末名を選択する
![[ツールバー]→[FireMobileSimulator]→端末名を選択する](http://cz-cdn.shoeisha.jp/static/images/article/4401/fx_test_b.gif)
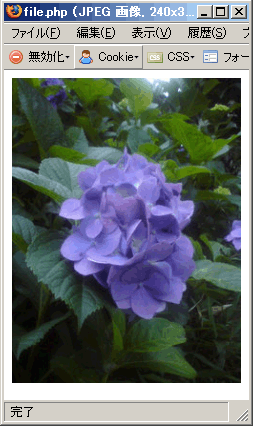
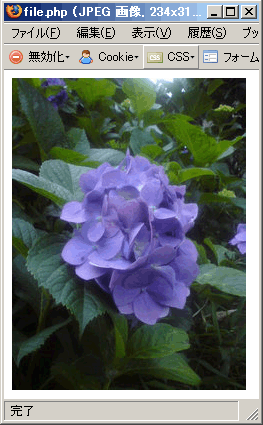
テスト結果です。選択した機種に応じて画像のサイズが変更されているのを確認します。
Docomo P903 (240x320) での実行結果
au C5001T (144x192) での実行結果

SoftBank 731SC (234x312)での実行結果
Firefoxでのテストが終わったら実機からアクセスして確認します。
まとめ
PHPの画像処理インターフェースImagickとNet_UserAgent_Mobileを利用して携帯電話向けの画像サイズ変換の例を説明しました。
Imagickには画像への文字出力、反転、切り出し、gifアニメ画像の加工等の機能もあります。これらの機能については次回の解説で触れる予定です。


